Set up Raspberry Pi as a Network Server
The Raspberry Pi has an infinite amount of uses and one of them is using it as a network server. This is handy because people in your home network can connect to this network server and access shared files, such as movies and music, which can be streamed to your TV. I will be going over how to set this up on a fresh RPi.
Install Raspbian
Raspbian is a light-weight Debian based Linux distro tailored for the RPi. Head over to the downloads page and download the img file.
Once it’s downloaded and extracted from the zip, plug in the SD card to your computer which will be used as the boot drive.
First list out the mounted media devices by using df (disk free) command:
$ df -h
Filesystem                  Size   Used  Avail Capacity  iused      ifree %iused  Mounted on
/dev/disk1                 167Gi  143Gi   24Gi    86% 37452708    6246366   86%   /
devfs                      344Ki  344Ki    0Bi   100%     1192          0  100%   /dev
map -hosts                   0Bi    0Bi    0Bi   100%        0          0  100%   /net
map auto_home                0Bi    0Bi    0Bi   100%        0          0  100%   /home
/dev/disk2s1               7.4Gi  3.0Mi  7.4Gi     1%        0          0  100%   /Volumes/NO NAME
In my case, /dev/disk2s1 is the SD card. It will probably be different for you.
Next unmount the SD card using umount to be able to write the img on to it. It is important that you make sure you are unmounting the correct device.
$ sudo umount /dev/disk2s1
If you’re on OS X and get the following error message:
umount(/Volumes/NO NAME): Resource busy -- try 'diskutil unmount'
Then use diskutil:
$ sudo diskutil umount /dev/disk2s1
Volume NO NAME on disk2s1 unmounted
Next write the Raspbian img to the SD card by using dd (dump data) command. This command simply takes the img as the input file and the SD card location as the output file.
VERY IMPORTANT that the output path is pointing to your own SD card. If not set correctly it can possibly corrupt your hard drive.
$ sudo dd bs=4m if=~/Downloads/2015-11-21-raspbian-jessie-lite.img of=/dev/disk2
347+1 records in
347+1 records out
1458569216 bytes transferred in 654.878776 secs (2227235 bytes/sec)
Be patient. It might take a minute or two to burn the Raspbian image.
After it is complete plug it in to your RPi with ethernet connected and boot.
The default credentials for Raspbian are:
username: pi
password: raspberry
Install Samba
Samba is a popular piece of software that enable directory and file sharing across a network. It is a Linux implementation of the Server Message Block (SMB) protocol.
First update Raspbian packages to the latest:
$ sudo apt-get update
Now install samba and smbclient on the RPi. Samba also supports the Windows Naming System (WINS) and support for joining Windows workgroups. A workgroup is a group of computers on a Local Area Network (LAN) that can access each other’s shared directories. Samba-common-bin contains a tool for registering users with Samba. Smbclient will be used for testing the SMB connection.
$ sudo apt-get install samba samba-common-bin smbclient
After the packages are installed we, we will add user pi to the local smbpasswd file.
$ sudo smbpasswd -a pi
New SMB password:
Retype new SMB password:
Added user pi.
You can use smbpasswd to change password if you need to:
$ smbpasswd
Old SMB password:
New SMB password:
Retype new SMB password:
Password changed for user pi
So now samba is installed, let’s mount a hard drive to be used as the shared storage device.
Mount Hard Drive
A convenient little tool is blkid which lists connected drives and their filesystem type.
$ sudo blkid
/dev/mmcblk0p1: SEC_TYPE="msdos" LABEL="boot" UUID="C0E6-1BEB" TYPE="vfat"
/dev/mmcblk0p2: UUID="9c7e2035-df9b-490b-977b-d60f2170889d" TYPE="ext4"
/dev/sda1: LABEL="My Passport" UUID="4E1AEA7B1AEA6007" TYPE="ntfs"
/dev/sdb1: LABEL="Ubuntu 15.10 amd64" TYPE="iso9660"
/dev/sdb2: SEC_TYPE="msdos" UUID="99B5-7FC8" TYPE="vfat"
If my case I will be mounting the Western Digital “My Passport” external hard drive located at /dev/sda1 which has an ntfs file system. In your case it might be different so take note of the drive path.
It’s standard to mount drives in /mnt so we need to create a new directory there.
$ sudo mkdir /mnt/hd
Now we just mount the drive to that location.
$ mount /dev/sda1 /mnt/hd
If you get the following error:
mount: only root can do that
then do not run sudo because we want normal users to access the drive instead of always being root. So what we need to do is append a line to /etc/fstab that allows normal users to mount the drive to a specified mounting location.
$ sudo vim /etc/fstab
Append this line but note that you might need to edit the paths and filesystem to your own requirements.
/dev/sda1 /mnt/hd ntfs rw,user,exec,umask=000 0 0
The complete /etc/fstab file should look something like this:
proc            /proc           proc    defaults          0       0
/dev/mmcblk0p1  /boot           vfat    defaults          0       2
/dev/mmcblk0p2  /               ext4    defaults,noatime  0       1
# a swapfile is not a swap partition, no line here
#   use  dphys-swapfile swap[on|off]  for that

# Allow normal users to mount `/dev/sda` drive to `/mnt/hd`.
/dev/sda1       /mnt/hd         ntfs    rw,user,exec,umask=000 0 0
Make sure to save the file.
If you ever need to unmount the drive, simply run:
umount /mnt/hd
We have the drive now in place so let’s configure Samba and start it up.
Configure Samba
The Samba configuration file is located in /etc/samba/smb.conf:
$ sudo vim /etc/samba/smb.conf
In this example we will be adding a Movies directory which points to the path /mnt/hd/Movies where my movies are located. Simply append it to the bottom of the configuration file.
[Movies]
    comment=Movies
    path = /mnt/hd/Movies
    available = yes
    valid users = @users
    read only = no
    browsable = yes
    read only = no
    writeable = yes
    only guest = no
    public = no
    create mask = 0700
    directory mask = 0777
Save it and restart the restart the Samba server for changes to take effect.
$ sudo /etc/init.d/samba restart
Restarting nmbd (via systemctl): nmbd.service.
Restarting smbd (via systemctl): smbd.service.
Restarting samba-ad-dc (via systemctl): samba-ad-dc.service.
Alternatively you can do:
service samba restart
Now test with the SMB client to make sure the folder is recognized.
$ smbclient -L localhost
Enter pi's password:
Enter pi's password:
Domain=[WORKGROUP] OS=[Unix] Server=[Samba 4.1.17-Debian]

        Sharename       Type      Comment
        ---------       ----      -------
        print$          Disk      Printer Drivers
        Movies          Disk      Movies
        IPC$            IPC       IPC Service (Samba 4.1.17-Debian)
        pi              Disk      Home Directories
Domain=[WORKGROUP] OS=[Unix] Server=[Samba 4.1.17-Debian]

        Server               Comment
        ---------            -------
        RASPBERRYPI          Samba 4.1.17-Debian

        Workgroup            Master
        ---------            -------
        WORKGROUP            RASPBERRYPI
The entire Samba configuration file might look something like this:
#
# Sample configuration file for the Samba suite for Debian GNU/Linux.
#
#
# This is the main Samba configuration file. You should read the
# smb.conf(5) manual page in order to understand the options listed
# here. Samba has a huge number of configurable options most of which
# are not shown in this example
#
# Some options that are often worth tuning have been included as
# commented-out examples in this file.
#  - When such options are commented with ";", the proposed setting
#    differs from the default Samba behaviour
#  - When commented with "#", the proposed setting is the default
#    behaviour of Samba but the option is considered important
#    enough to be mentioned here
#
# NOTE: Whenever you modify this file you should run the command
# "testparm" to check that you have not made any basic syntactic
# errors.

#======================= Global Settings =======================

[global]

## Browsing/Identification ###

# Change this to the workgroup/NT-domain name your Samba server will part of
   workgroup = WORKGROUP

# Windows Internet Name Serving Support Section:
# WINS Support - Tells the NMBD component of Samba to enable its WINS Server
#   wins support = no

# WINS Server - Tells the NMBD components of Samba to be a WINS Client
# Note: Samba can be either a WINS Server, or a WINS Client, but NOT both
;   wins server = w.x.y.z

# This will prevent nmbd to search for NetBIOS names through DNS.
   dns proxy = no

#### Networking ####

# The specific set of interfaces / networks to bind to
# This can be either the interface name or an IP address/netmask;
# interface names are normally preferred
;   interfaces = 127.0.0.0/8 eth0

# Only bind to the named interfaces and/or networks; you must use the
# 'interfaces' option above to use this.
# It is recommended that you enable this feature if your Samba machine is
# not protected by a firewall or is a firewall itself.  However, this
# option cannot handle dynamic or non-broadcast interfaces correctly.
;   bind interfaces only = yes

#### Debugging/Accounting ####

# This tells Samba to use a separate log file for each machine
# that connects
   log file = /var/log/samba/log.%m
# Cap the size of the individual log files (in KiB).
   max log size = 1000

# If you want Samba to only log through syslog then set the following
# parameter to 'yes'.
#   syslog only = no

# We want Samba to log a minimum amount of information to syslog. Everything
# should go to /var/log/samba/log.{smbd,nmbd} instead. If you want to log
# through syslog you should set the following parameter to something higher.
   syslog = 0

# Do something sensible when Samba crashes: mail the admin a backtrace
   panic action = /usr/share/samba/panic-action %d

####### Authentication #######

# Server role. Defines in which mode Samba will operate. Possible
# values are "standalone server", "member server", "classic primary
# domain controller", "classic backup domain controller", "active
# directory domain controller".
#
# Most people will want "standalone sever" or "member server".
# Running as "active directory domain controller" will require first
# running "samba-tool domain provision" to wipe databases and create a
# new domain.
   server role = standalone server

# If you are using encrypted passwords, Samba will need to know what
# password database type you are using.
   passdb backend = tdbsam

   obey pam restrictions = yes

# This boolean parameter controls whether Samba attempts to sync the Unix
# password with the SMB password when the encrypted SMB password in the
# passdb is changed.
   unix password sync = yes

# For Unix password sync to work on a Debian GNU/Linux system, the following
# parameters must be set (thanks to Ian Kahan <<[email protected]> for
# sending the correct chat script for the passwd program in Debian Sarge).
   passwd program = /usr/bin/passwd %u
   passwd chat = *Enter\snew\s*\spassword:* %n\n *Retype\snew\s*\spassword:* %n\n *password\supdated\ssuccessfully* .

# This boolean controls whether PAM will be used for password changes
# when requested by an SMB client instead of the program listed in
# 'passwd program'. The default is 'no'.
   pam password change = yes

# This option controls how unsuccessful authentication attempts are mapped
# to anonymous connections
   map to guest = bad user

########## Domains ###########

#
# The following settings only takes effect if 'server role = primary
# classic domain controller', 'server role = backup domain controller'
# or 'domain logons' is set
#

# It specifies the location of the user's
# profile directory from the client point of view) The following
# required a [profiles] share to be setup on the samba server (see
# below)
;   logon path = \\%N\profiles\%U
# Another common choice is storing the profile in the user's home directory
# (this is Samba's default)
#   logon path = \\%N\%U\profile

# The following setting only takes effect if 'domain logons' is set
# It specifies the location of a user's home directory (from the client
# point of view)
;   logon drive = H:
#   logon home = \\%N\%U

# The following setting only takes effect if 'domain logons' is set
# It specifies the script to run during logon. The script must be stored
# in the [netlogon] share
# NOTE: Must be store in 'DOS' file format convention
;   logon script = logon.cmd

# This allows Unix users to be created on the domain controller via the SAMR
# RPC pipe.  The example command creates a user account with a disabled Unix
# password; please adapt to your needs
; add user script = /usr/sbin/adduser --quiet --disabled-password --gecos "" %u

# This allows machine accounts to be created on the domain controller via the
# SAMR RPC pipe.
# The following assumes a "machines" group exists on the system
; add machine script  = /usr/sbin/useradd -g machines -c "%u machine account" -d /var/lib/samba -s /bin/false %u
# This allows Unix groups to be created on the domain controller via the SAMR
# RPC pipe.
; add group script = /usr/sbin/addgroup --force-badname %g

############ Misc ############

# Using the following line enables you to customise your configuration
# on a per machine basis. The %m gets replaced with the netbios name
# of the machine that is connecting
;   include = /home/samba/etc/smb.conf.%m

# Some defaults for winbind (make sure you're not using the ranges
# for something else.)
;   idmap uid = 10000-20000
;   idmap gid = 10000-20000
;   template shell = /bin/bash

# Setup usershare options to enable non-root users to share folders
# with the net usershare command.

# Maximum number of usershare. 0 (default) means that usershare is disabled.
;   usershare max shares = 100

# Allow users who've been granted usershare privileges to create
# public shares, not just authenticated ones
   usershare allow guests = yes

#======================= Share Definitions =======================

[homes]
   comment = Home Directories
   browseable = no

# By default, the home directories are exported read-only. Change the
# next parameter to 'no' if you want to be able to write to them.
   read only = yes

# File creation mask is set to 0700 for security reasons. If you want to
# create files with group=rw permissions, set next parameter to 0775.
   create mask = 0700

# Directory creation mask is set to 0700 for security reasons. If you want to
# create dirs. with group=rw permissions, set next parameter to 0775.
   directory mask = 0700

# By default, \\server\username shares can be connected to by anyone
# with access to the samba server.
# The following parameter makes sure that only "username" can connect
# to \\server\username
# This might need tweaking when using external authentication schemes
   valid users = %S

# Un-comment the following and create the netlogon directory for Domain Logons
# (you need to configure Samba to act as a domain controller too.)
;[netlogon]
;   comment = Network Logon Service
;   path = /home/samba/netlogon
;   guest ok = yes
;   read only = yes

# Un-comment the following and create the profiles directory to store
# users profiles (see the "logon path" option above)
# (you need to configure Samba to act as a domain controller too.)
# The path below should be writable by all users so that their
# profile directory may be created the first time they log on
;[profiles]
;   comment = Users profiles
;   path = /home/samba/profiles
;   guest ok = no
;   browseable = no
;   create mask = 0600
;   directory mask = 0700

[printers]
   comment = All Printers
   browseable = no
   path = /var/spool/samba
   printable = yes
   guest ok = no
   read only = yes
   create mask = 0700

# Windows clients look for this share name as a source of downloadable
# printer drivers
[print$]
   comment = Printer Drivers
   path = /var/lib/samba/printers
   browseable = yes
   read only = yes
   guest ok = no
# Uncomment to allow remote administration of Windows print drivers.
# You may need to replace 'lpadmin' with the name of the group your
# admin users are members of.
# Please note that you also need to set appropriate Unix permissions
# to the drivers directory for these users to have write rights in it
;   write list = root, @lpadmin

# My shared directories
[Movies]
    comment=Movies
    path = /mnt/hd/Movies
    available = yes
    valid users = @users
    read only = no
    browsable = yes
    read only = no
    writeable = yes
    only guest = no
    public = no
    create mask = 0700
    directory mask = 0777
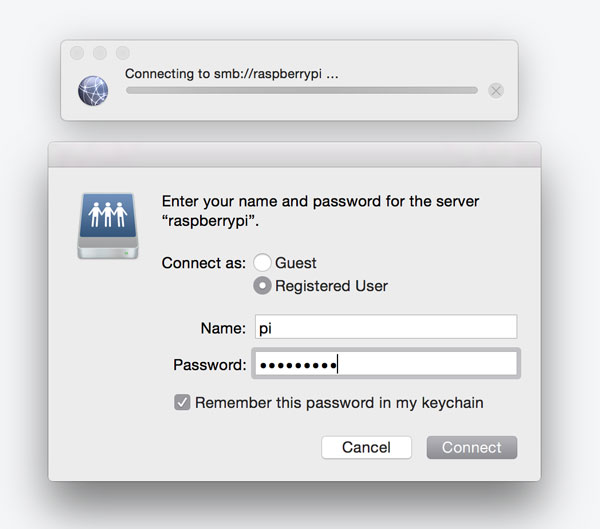
Connect to SMB in OS X
To connect to the Raspberry Pi network server follow these steps:
Go to
Finder -> Go -> Connect To Server
Enter the RPi hostname prefixed by the protocol.
smb://raspberrypi

To get the hostname you can use the hostname command on the RPi:
$ hostname
raspberrypi
Next enter the credential for SMB you have set up earlier.
Select the Volumes (directories) you wish to mount.
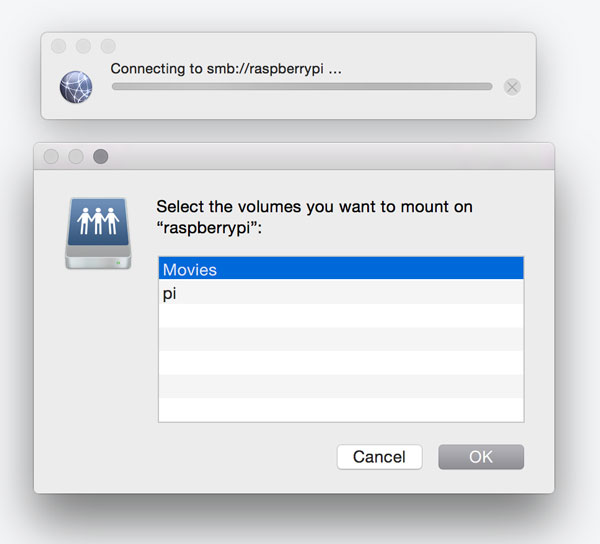
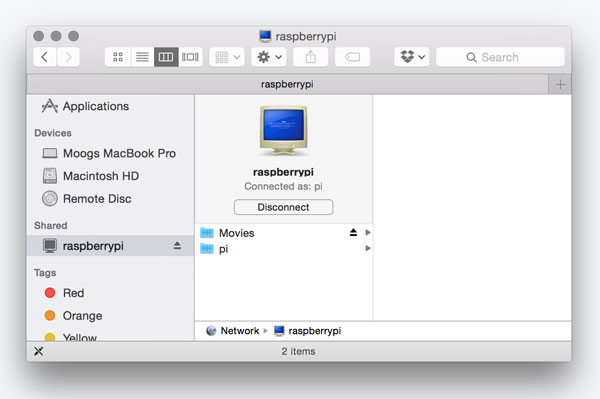
Now you’re connected to the shared network.
Streaming videos
The Google Chromecast is a must for easily streaming content to your TV.
Videostream for Google Chromecast is a great Chrome app for streaming a large number video formats from your computer.
FileBrowser for iOS is a fantastic app for connecting to SMB and opening different file types in your phone.
VLC for Mobile is the best video player for iOS I’ve come across.
Conclusion
A Raspberry Pi running Samba makes a great network server on a budget. Easy to set up and cheap.