Rooting an Amazon Fire TV Stick 4K
This tutorial will walk you through the high-level process of rooting an Amazon Fire TV Stick 4K (3rd generation of Fire TV Stick, released in 2017).
Rooting the stick is possible thanks to an exploit uncovered by user xyz on the XDA forums and user k4y0z who created a nice package for executing the exploit. They called this package kamakiri.
Why root
Unlocking the Fire TV Stick with root access allows us to install anything we want on it and circumvent the limitations of the stock operating system. For example, here are some of the things that can be done with a rooted Fire TV Stick:
- Get the Google Play store installed
- Install root applications
- Mount external storage
- Replace the launcher
- Block Amazon auto-updates that remove features
- Remove bloatware applications
- Block ads on the homescreen and in applications
- Control Fire TV Stick from a computer
- Set up a SMB server
- NTFS support
- Overclock the CPU
- Use bash automation scripts
- and more!
We’ll only be going over the rooting process and optionally installing Arch Linux on Termux towards the end of this post.
What we’ll need
We’ll need the following items for this tutorial:
- An Amazon Fire TV Stick 4K
- A computer, preferably with Linux
- A USB drive
- A small flathead screwdriver
- A piece of aluminum foil
- An OTG cable
We’re going to use Linux to burn a patched Linux kernel ISO into the USB drive which will be used to boot from and run the exploit on the Fire TV Stick.
We need to make a slight hardware change to unlock the bootloader on the Fire TV Stick. The flathead screwdriver will be used to open up the Fire TV Stick to get access to the small capacitors on the board that we need to short circuit to unlock the bootloader. We’ll be connecting the points with a small piece of aluminum foil.
The OTG cable is for connecting external storage to the Fire TV Stick in order to expand it’s internal storage. The Fire TV Stick has only has 8GB of internal storage which less than 5GB are actually available for use. We install apps or move existing apps into the external storage to free up internal memory which should make the Fire TV Stick a bit more responsive.
Getting started
The sequence of steps we’ll be taking are the following:
- Open Fire TV Stick case #
- Remove Fire TV Stick heat shield #
- Short circuit to unlock bootloader #
- Download patched kernel ISO #
- Burn ISO to USB drive #
- Boot USB Drive on computer #
- Flash TWRP recovery image #
- Rooting with Magisk #
- Connect Fire TV Stick to TV #
- Install Termux #
- Install Arch Linux #
- Expand Fire TV Stick storage #
It’s important to note that you should do this on stick that has been setup already with an amazon account, since I’ve read that it may not be possible to set it up correctly after it’s rooted.
Also make sure to enable USB debugging by going into the Fire TV Stick: Settings -> My Fire TV -> Developer options -> turn ON for ADB debugging and turn ON for Apps from Unknown Sources
Open Fire TV Stick case
Opening the case is pretty simple; use a tool like a small flathead screwdriver or pry opening tool (like this one) and place it in between the crevice to open it. There’s multiple connecting joints that should pop open without much effort.
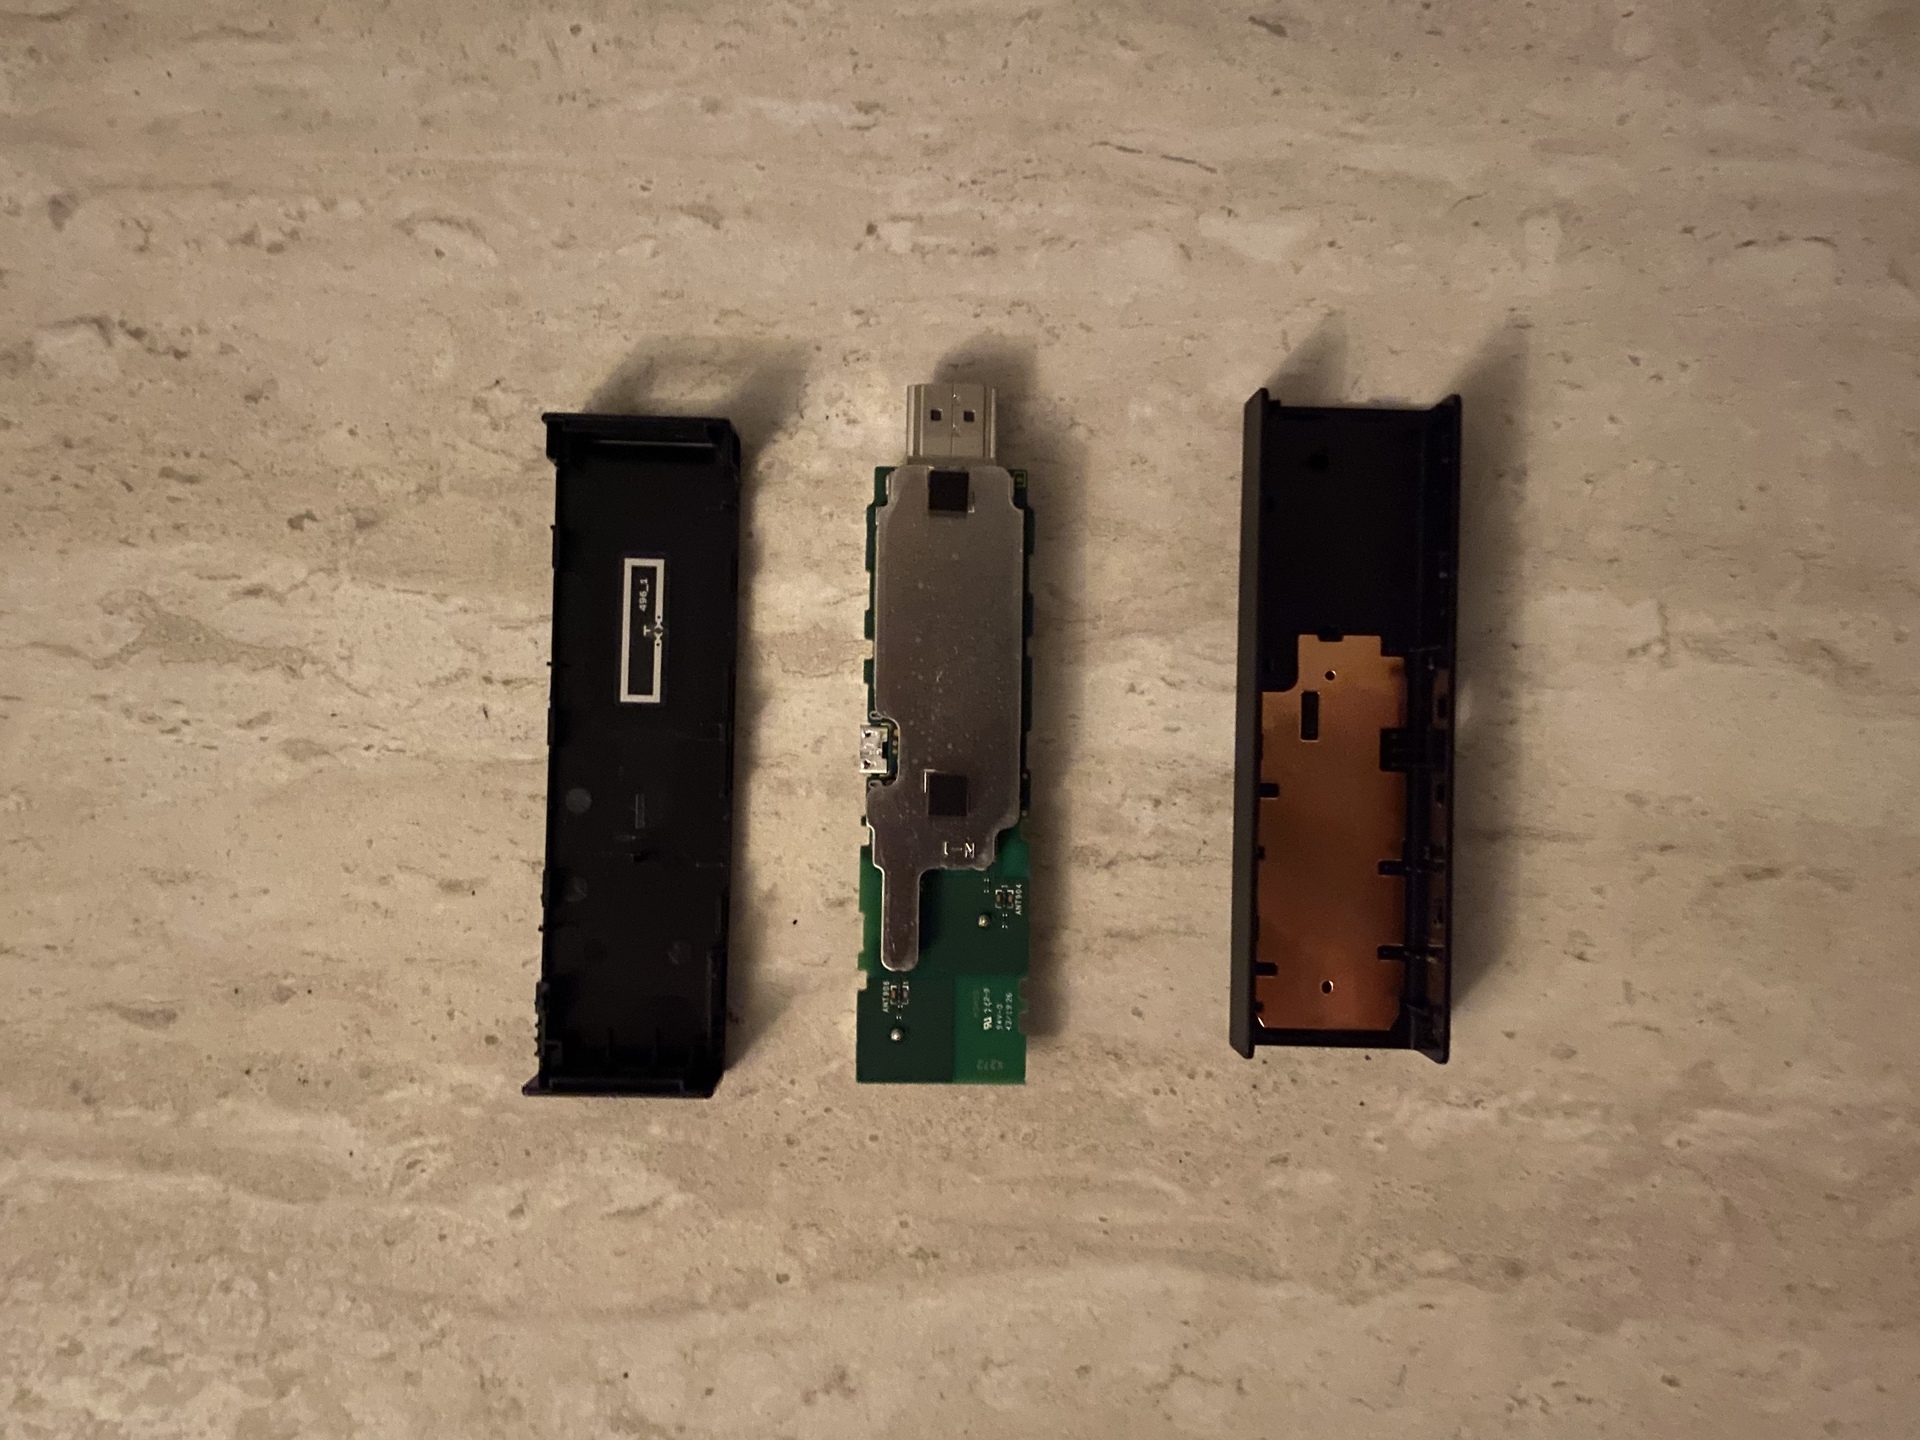
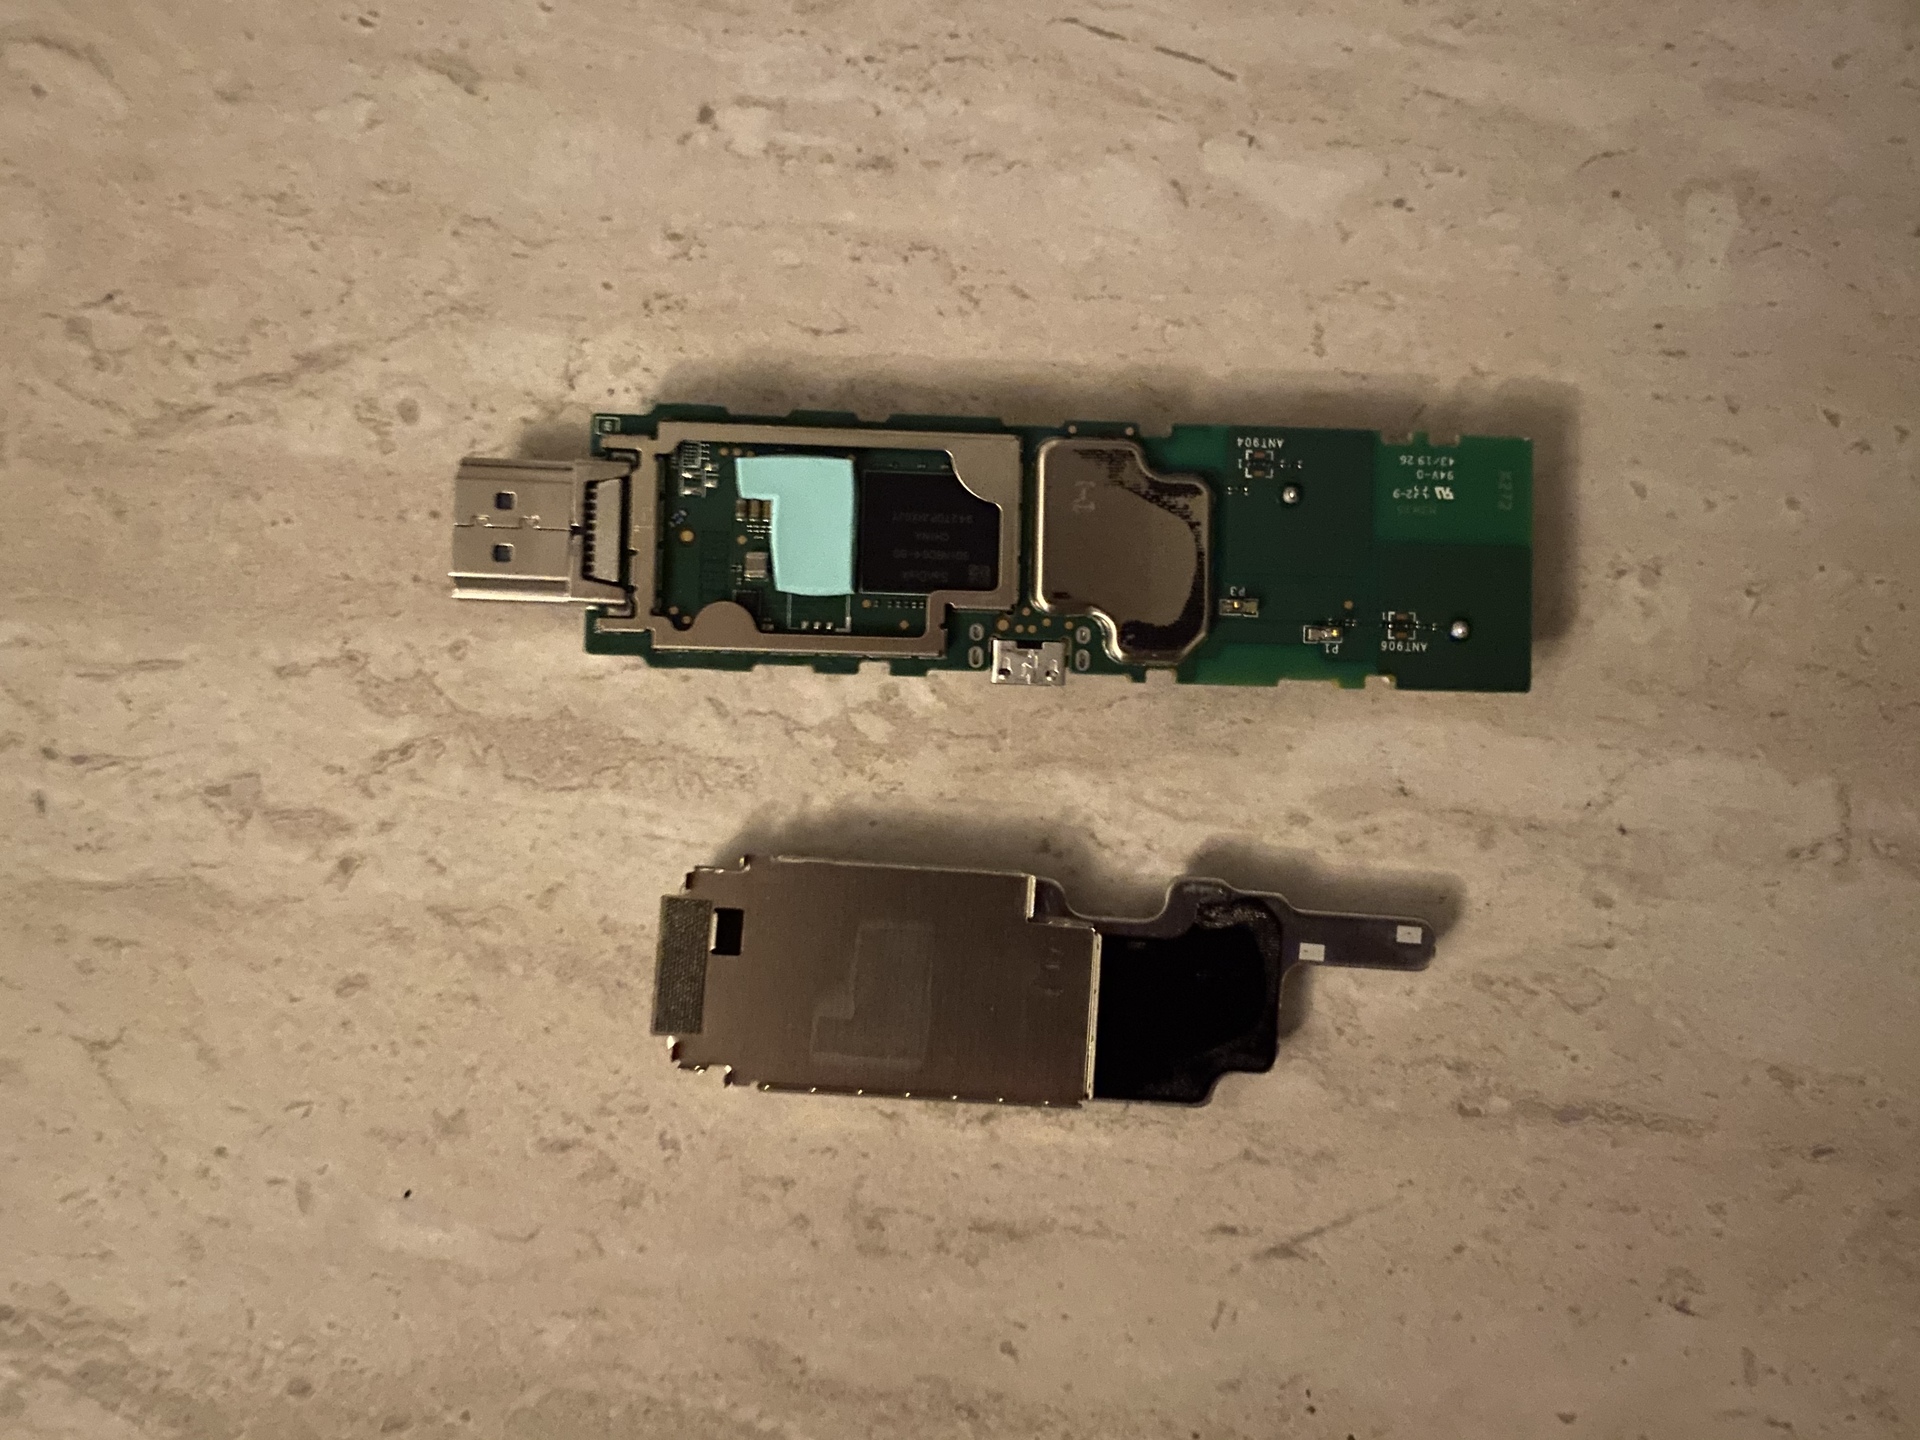
Remove Fire TV Stick heat shield
The next part is to remove the heat shield which is blocking the small capacitors we need access to. Use a small flathead screwdriver (a plastic one is preferable) or anything that you can slide underneath to unstick it from the base. The heat shield in on the side without the two square blocky antennas at the end.
The heat shield is held on by two sticky pads and should come off with little effort.
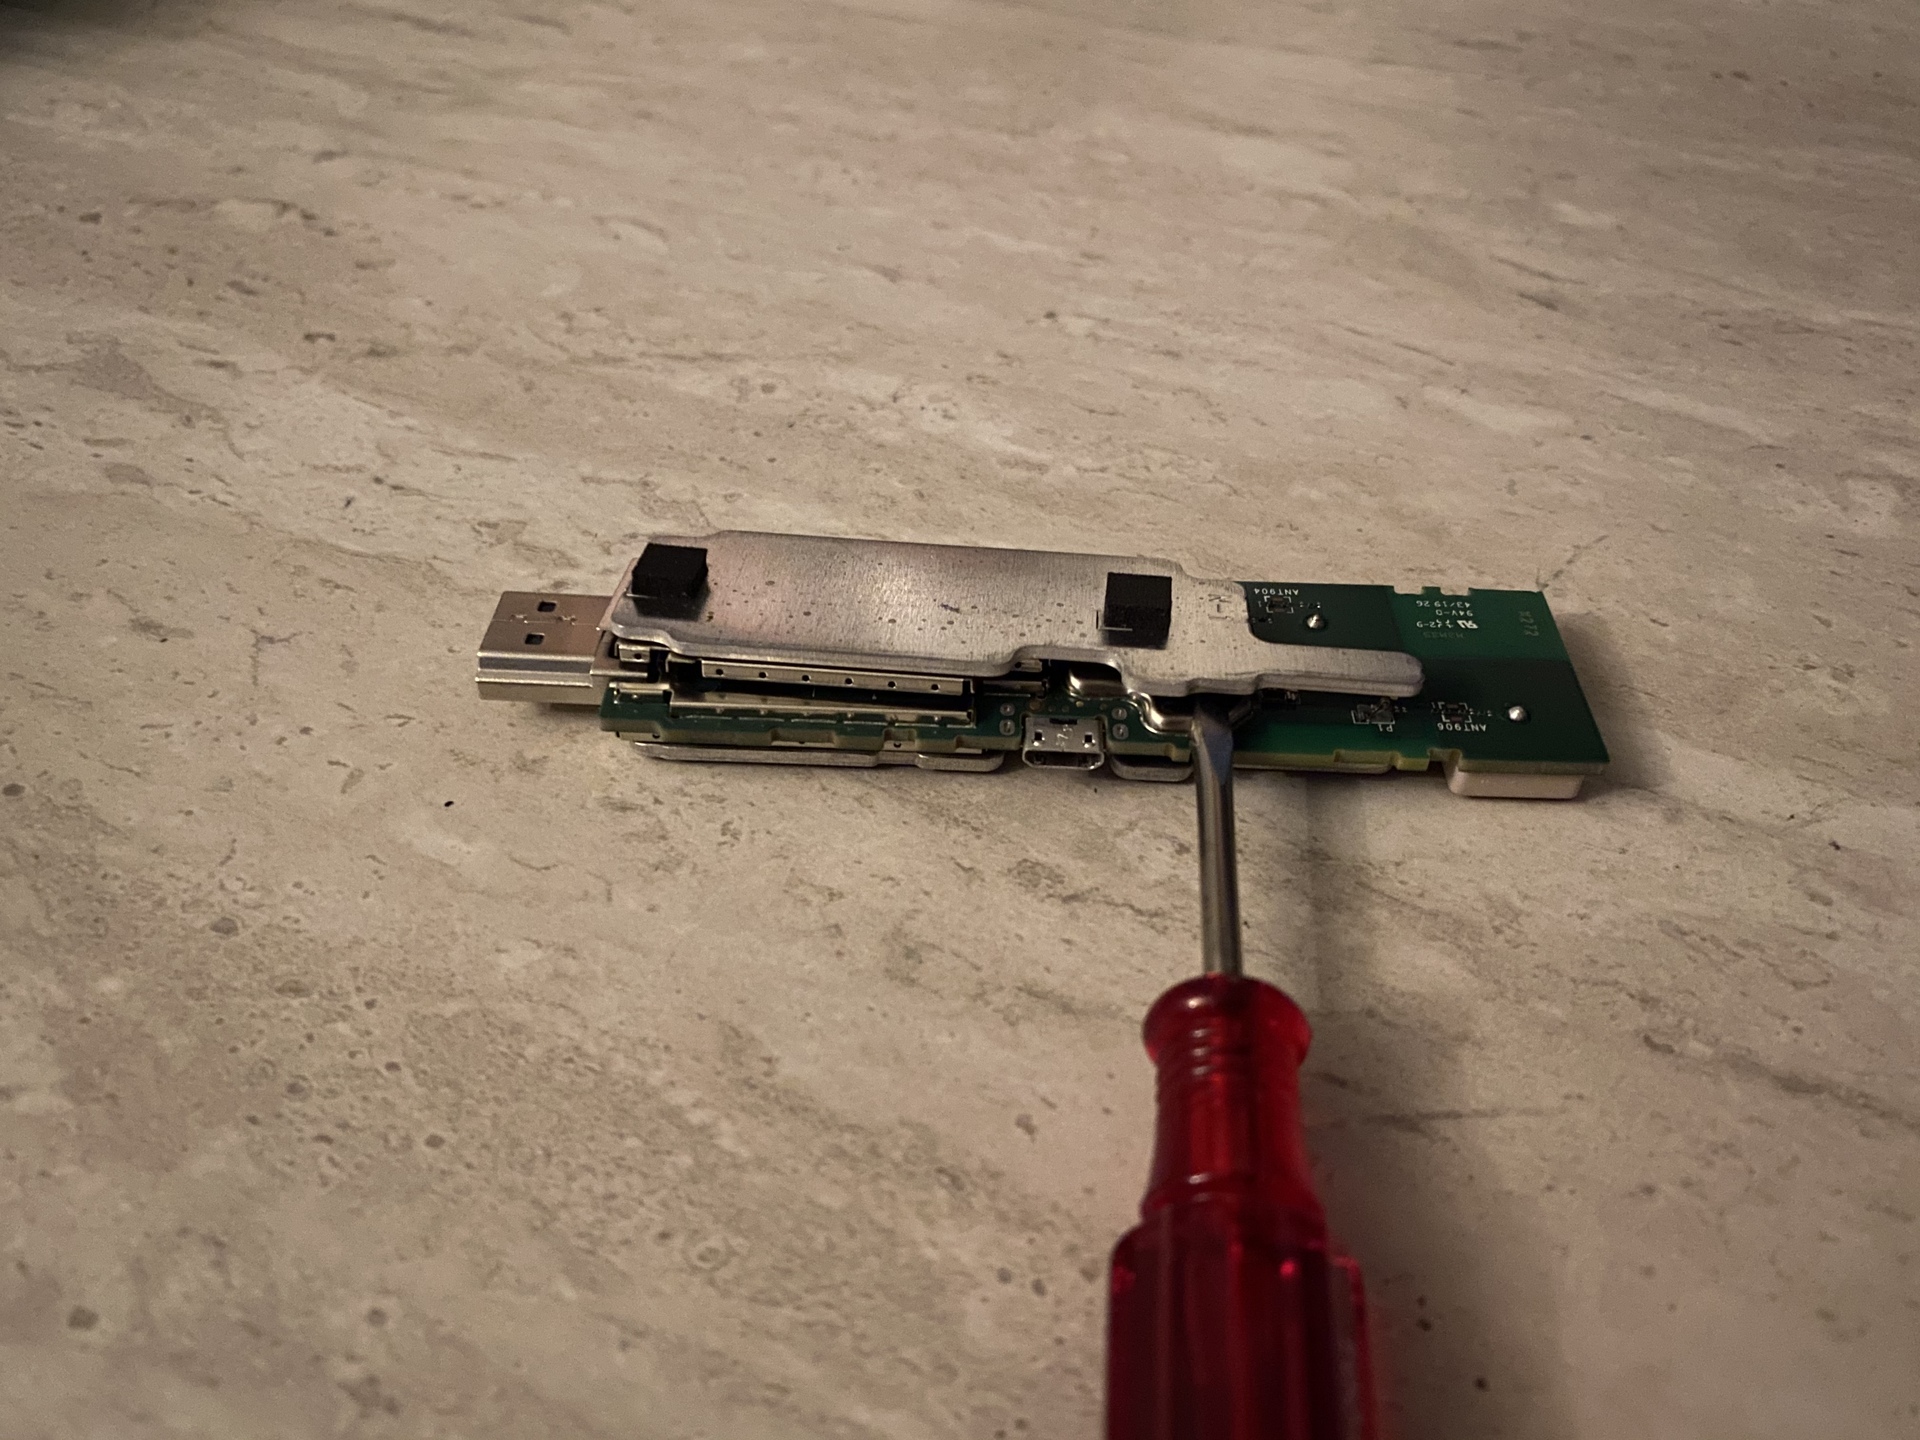
Short circuit to unlock bootloader
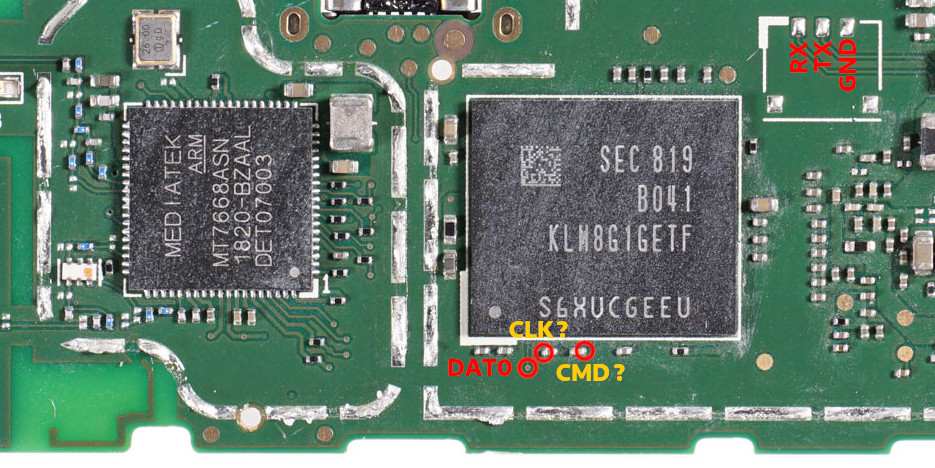
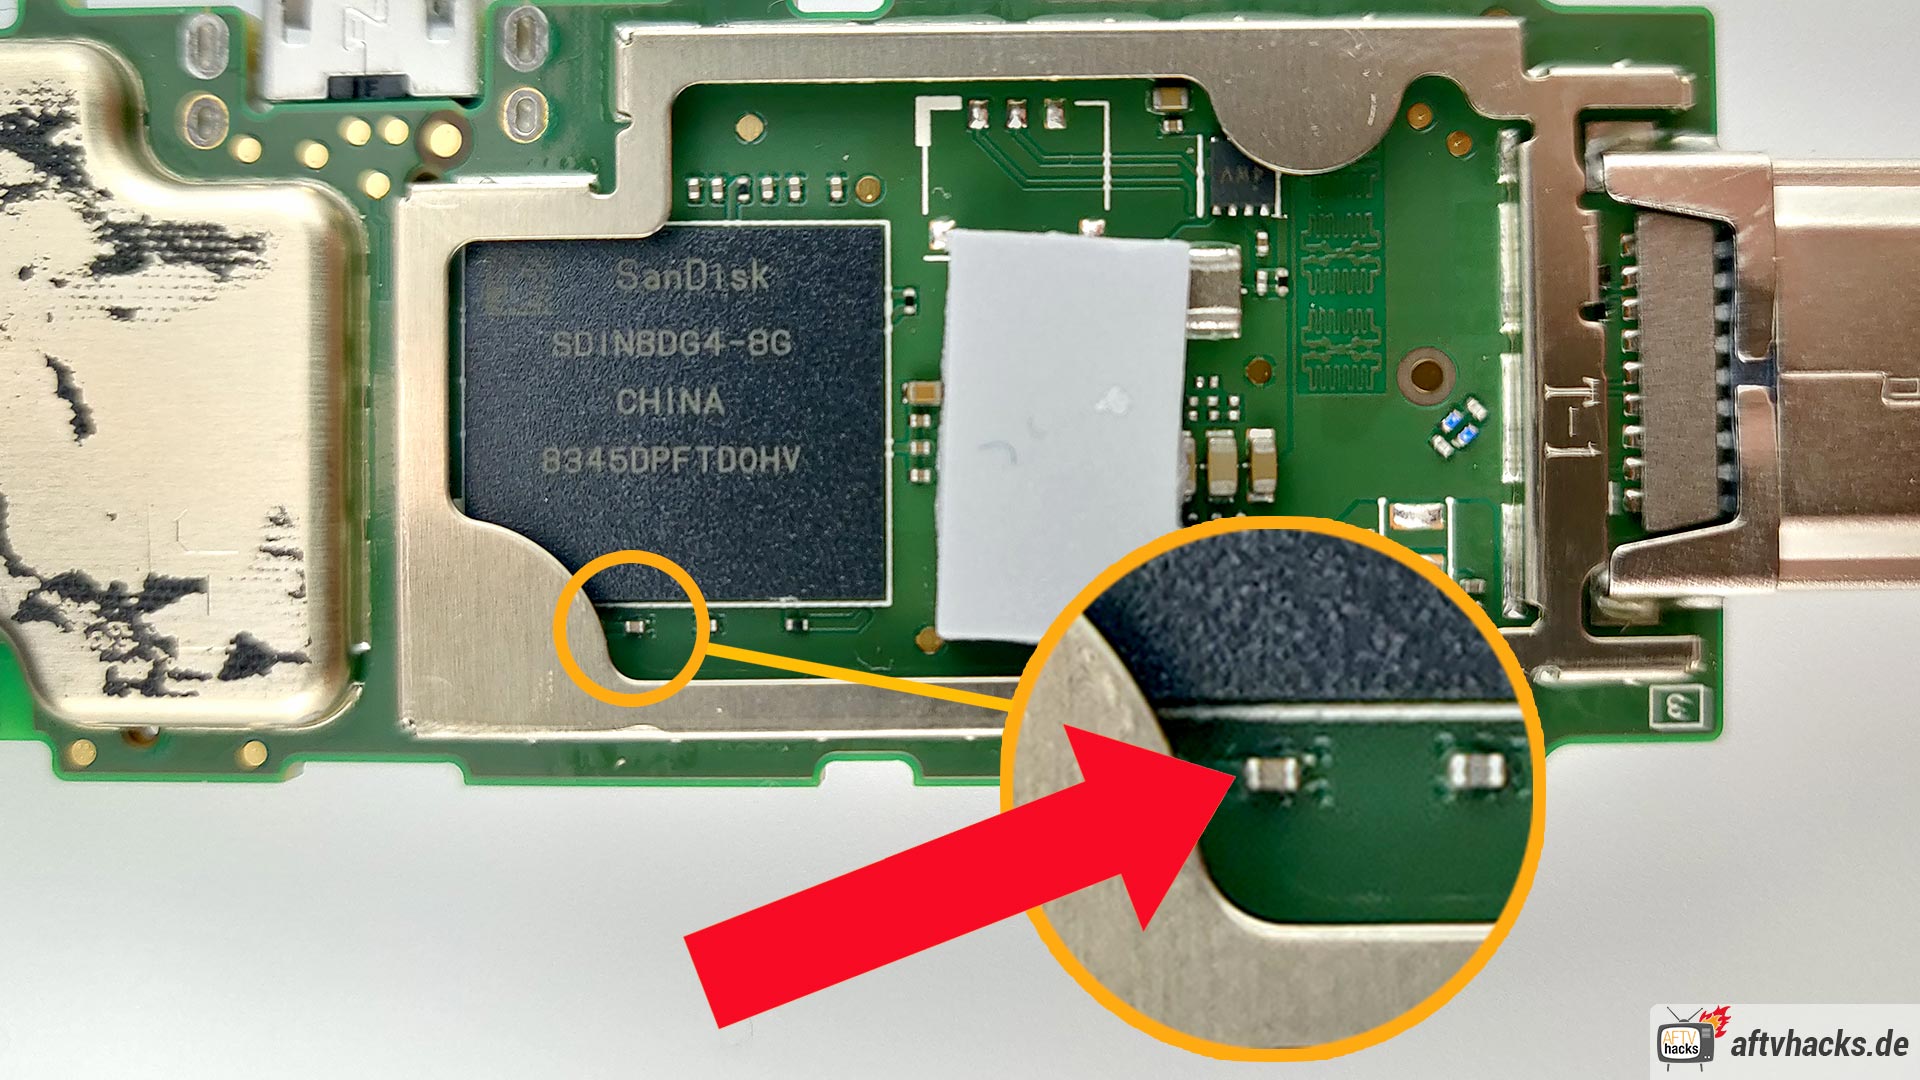
We need to create a short in order to unlock the bootloader. The short will put the bootrom in download mode allowing us to flash a custom image.
This is part is a little tricky because the capacitors we need to link are really small. These are the points we are trying to short in order to unlock the bootloader.
Here’s a close up image of the points on the board, showing without any of the metal housing:
(source)
Here’s another view showing the points. These points should be connected to the metal housing:
(source)
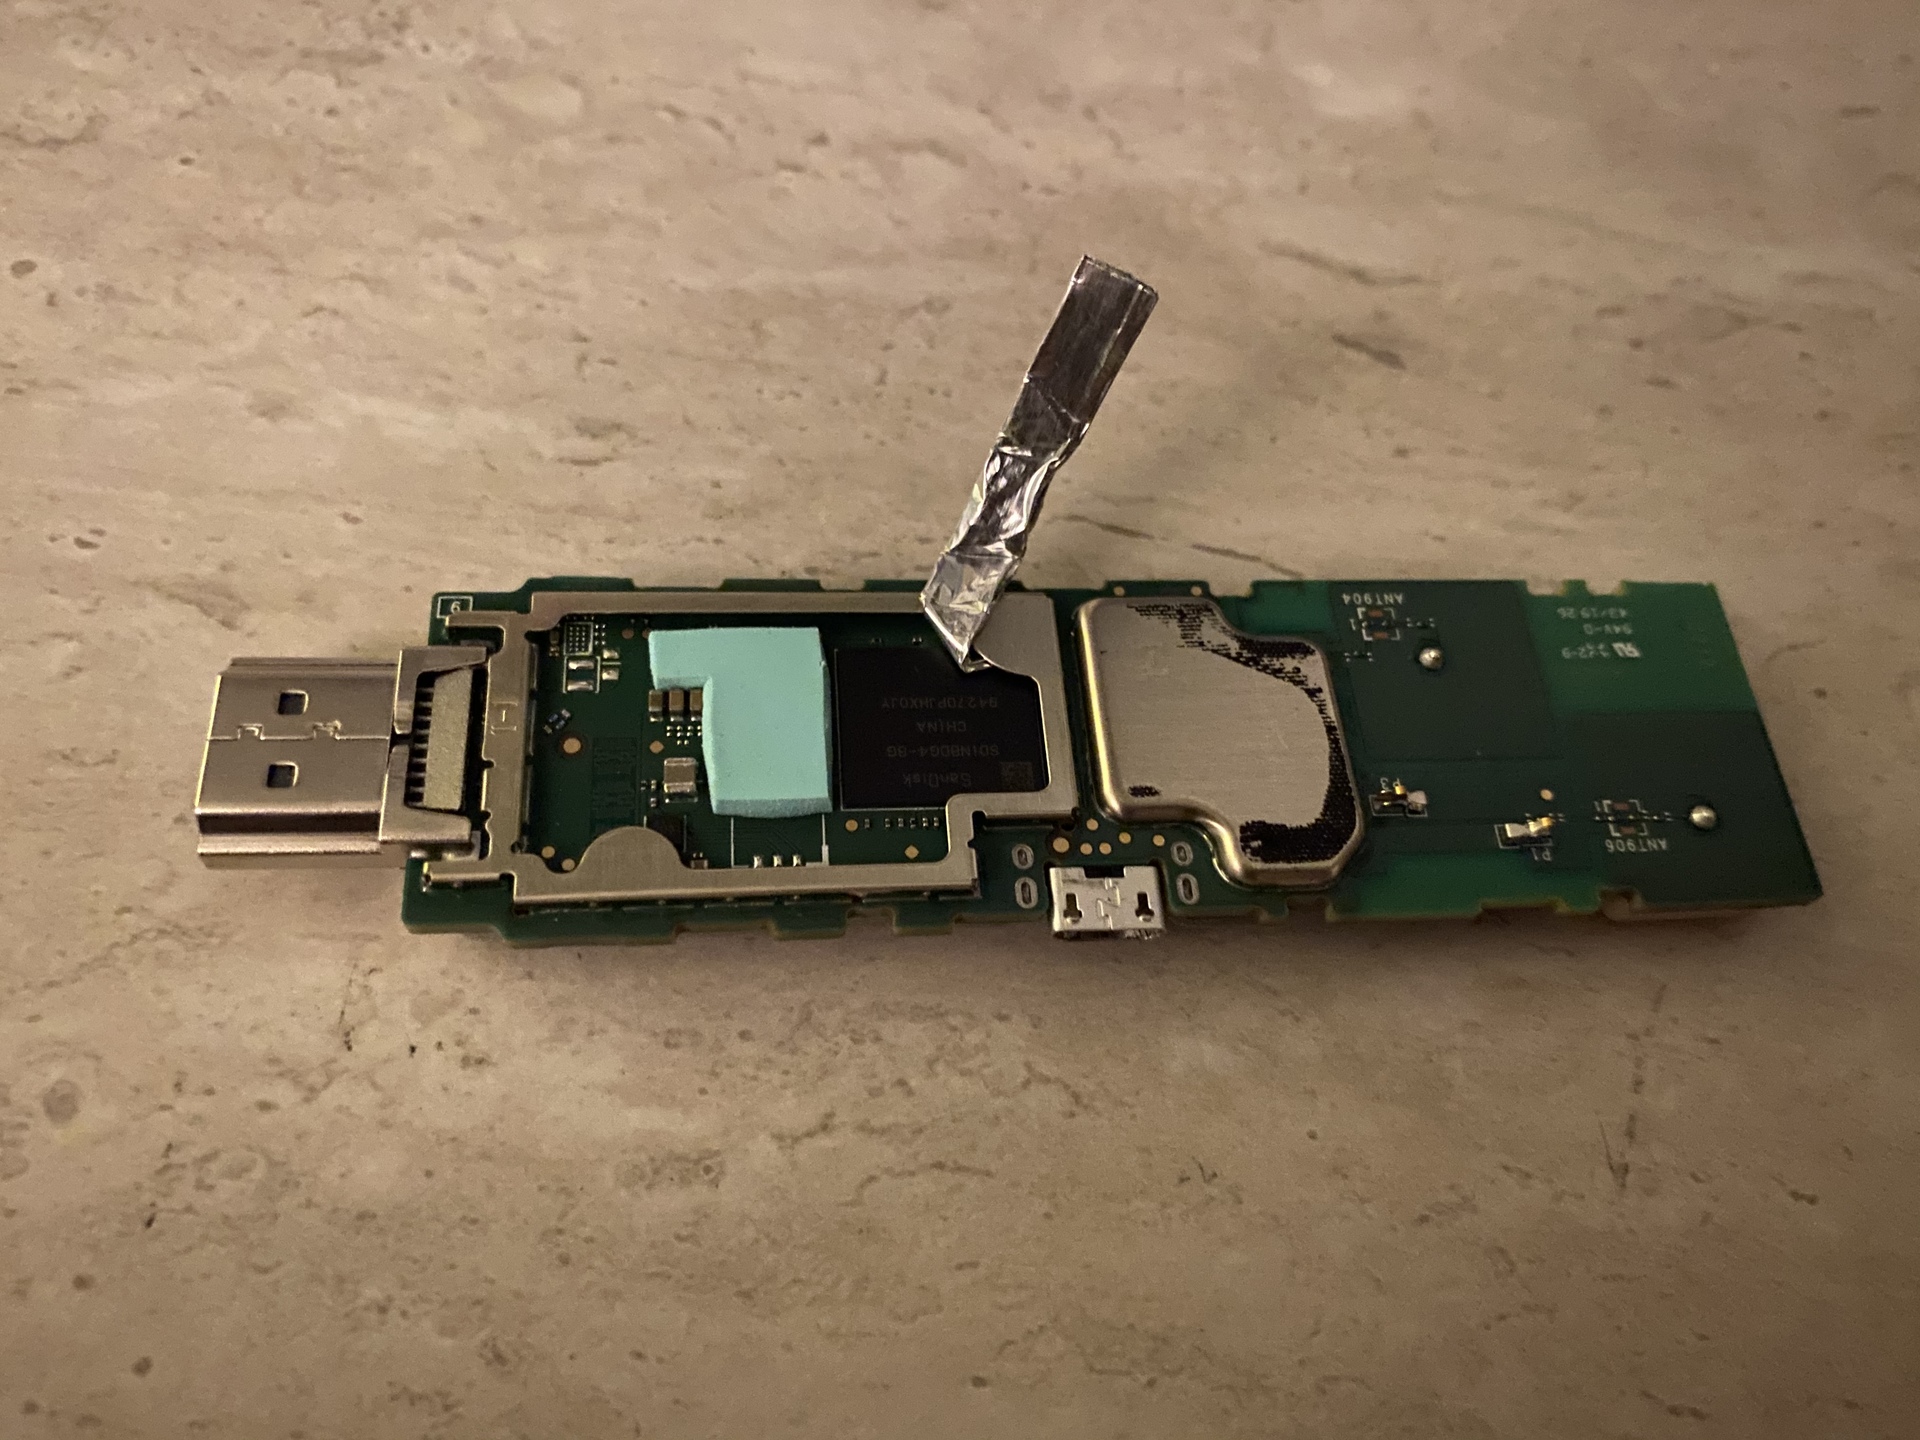
Take a small piece of aluminum foil and fold it loosely until you have a semi-flat skinny stick you can place underneath the part covering and fold it up so it remains in makes contact with the housing and remains in place.
Remember to be careful and not use sharp items or too much force since that could damage the caps and possibly brick the device.
Download patched kernel ISO
Download the patched Linux kernel image from https://github.com/amonet-kamakiri/fireiso. This ISO contains all the necessary applications to connect to the Fire Tv Stick though USB in order to launch the exploit.
The easiest way is to download the ISO with wget:
$ cd ~/Downloads
$ wget https://github.com/amonet-kamakiri/fireiso/releases/download/v1.0.0/fireiso-1.0.0.iso
Burn ISO to USB drive
Next we need to burn the FireISO image into a USB drive.
I always prefer to use dd because of it’s simplicity. First find out what device name is your USB drive after plugging it in. In my example I have a 16GB (displayed as 14.6G drive) located at /dev/sdb.
$ lsblk
nvme0n1     259:0    0 476.9G  0 disk
├─nvme0n1p1 259:1    0   468G  0 part /
├─nvme0n1p2 259:2    0     8G  0 part [SWAP]
└─nvme0n1p3 259:3    0 961.3M  0 part /boot/efi
sdb           8:16   1  14.6G  0 disk
├─sdb1        8:17   1   7.3G  0 part
├─sdb2        8:18   1    16M  0 part
└─sdb3        8:19   1   7.3G  0 part
Unmount the drive if it’s currently mounted:
$ sudo umount /dev/sdb1
Now burn the ISO image directly to USB device with dd. Always make sure the output path is correct to avoid accidentally overriding and possibly corrupting the wrong path or device!
$ sudo dd bs=4M if=~/Downloads/fireiso-1.0.0.iso of=/dev/sdb conv=fdatasync status=progress
If you’re on Windows then you can use rufus which is a popular GUI for created bootable USB drives on Windows.
Boot USB Drive on computer
Plug in your bootable USB drive into another computer to boot if you have another one or reboot from your current one if not. Go into the BIOS settings by pressing the appropriate function key which will differ depending on your computer model. Make sure that you can boot from the USB drive in the settings and exit BIOS.
You should be seeing a boot screen like this if the computer successfully booted from the USB drive.
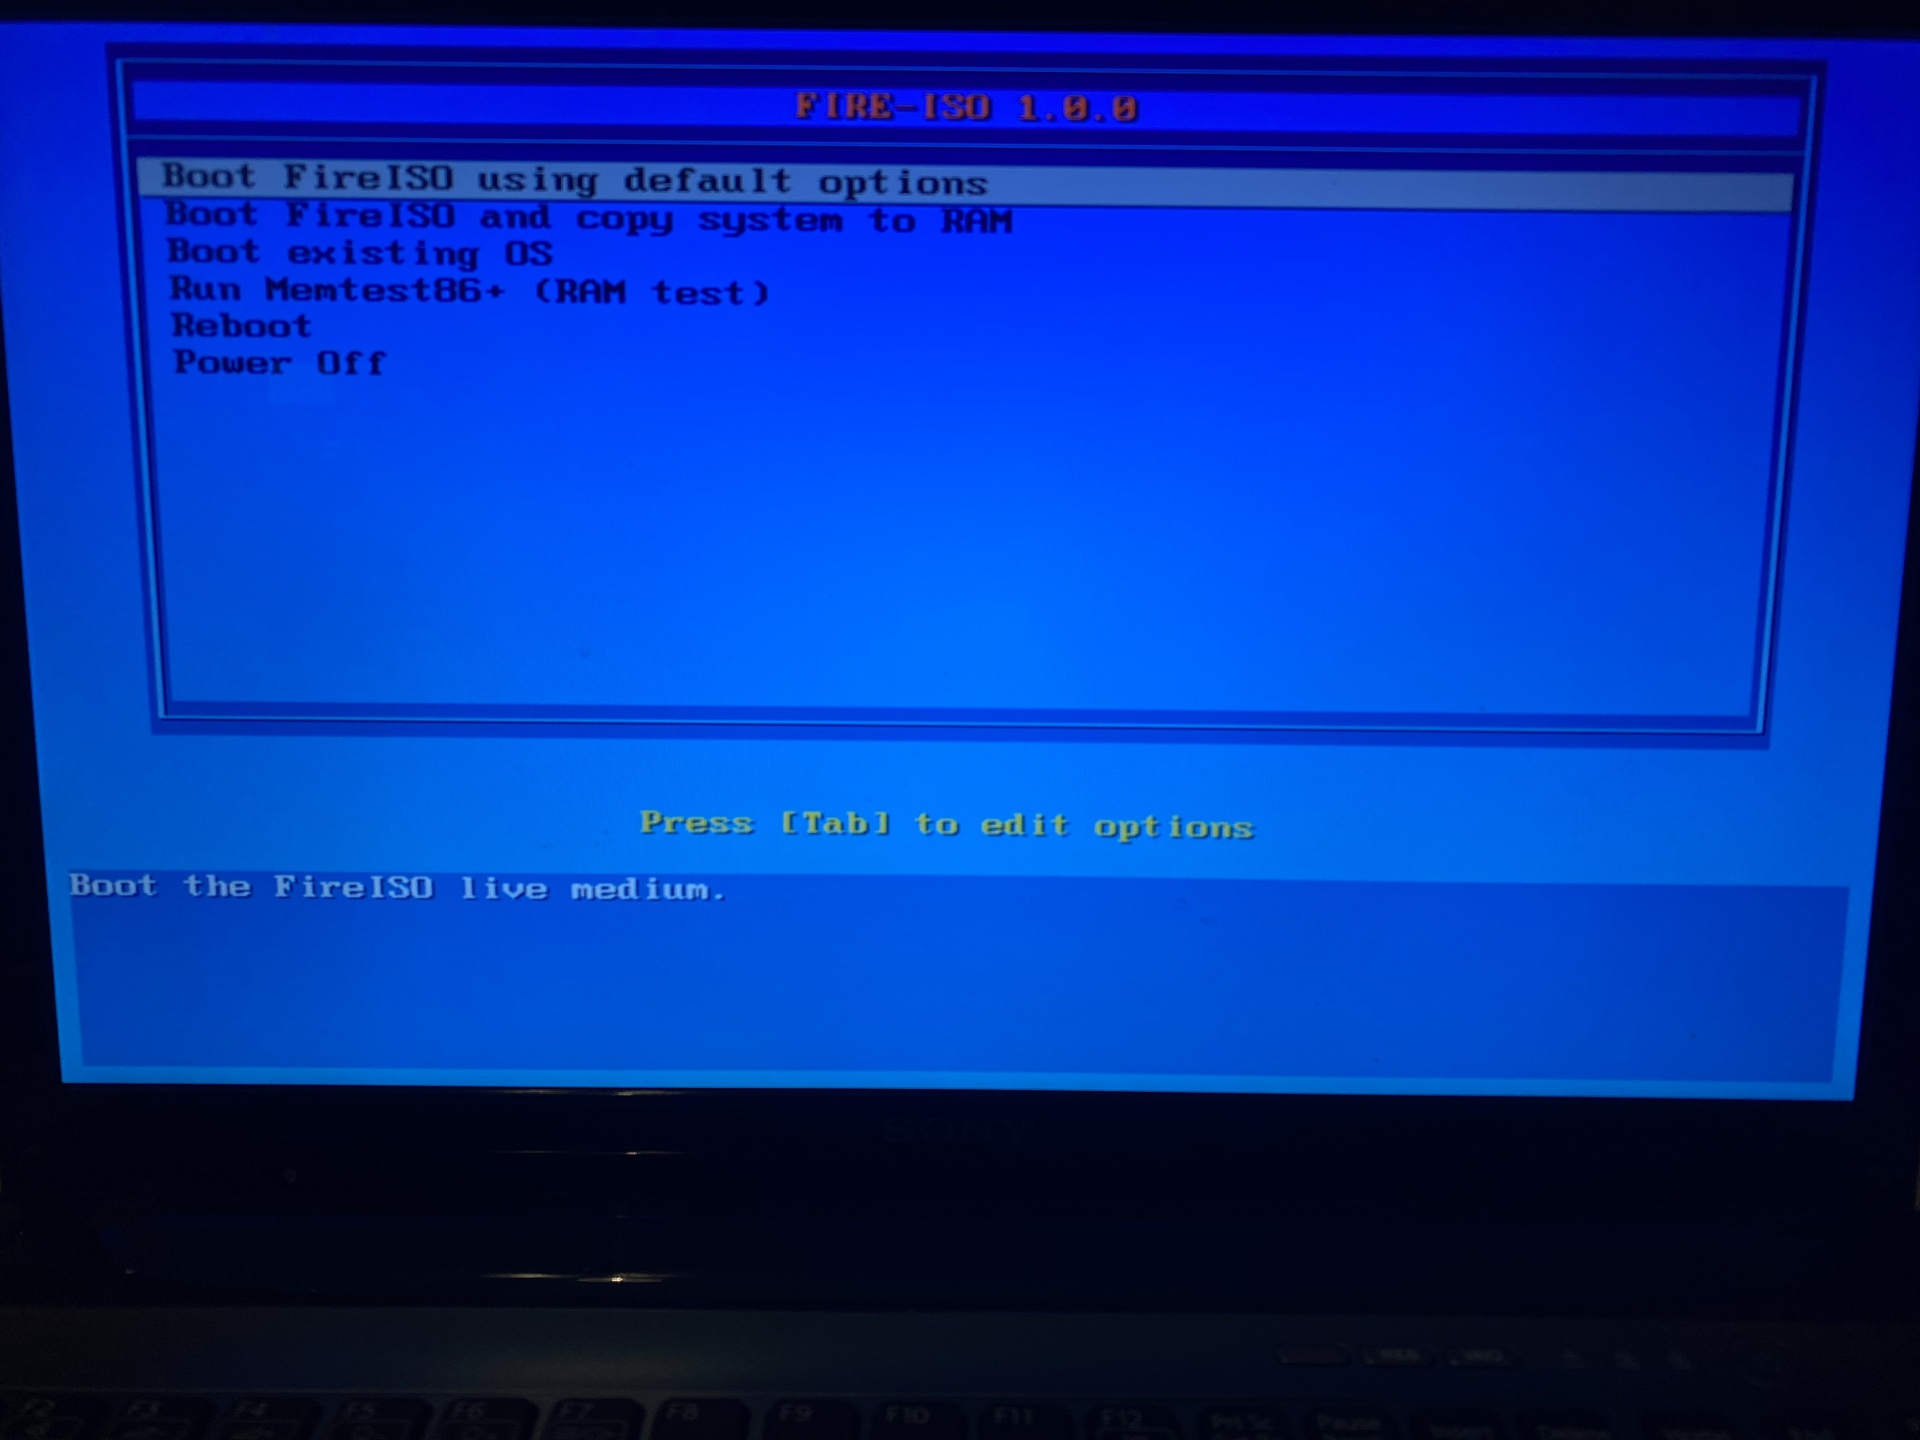
Select the first option Boot FireISO using default options and press enter.
Flash TWRP recovery image
The recovery program is called TWRP (Team Win Recovery Project) and allows us to install custom firmware, ROMs (such as Lineage OS), and the ability to back up the entire system.
Open up a terminal in the booted OS and change directory into the desktop. We’ll download all the necessary exploit files here.
[root@sysresccd ~]# ls
Desktop  packages-list.txt  packages-size.txt  version
[root@sysresccd ~]# cd ~/Desktop/
A user by the name of flakie has conveniently provided a zip containing necessary exploit scripts and Magisk. Magisk unlocks root access to the device after it’s been flashed with a recovery image. The zip containing exploit scripts is avaiable at https://flakie.co.uk/downloads/4k-exploit-files.zip.
[root@sysresccd ~/Desktop]# wget https://flakie.co.uk/downloads/4k-exploit-files.zip
--2020-10-11 07:58:39--  https://flakie.co.uk/downloads/4k-exploit-files.zip
Loaded CA certificate '/etc/ssl/certs/ca-certificates.crt'
Resolving flakie.co.uk (flakie.co.uk)... 77.72.1.21
Connecting to flakie.co.uk (flakie.co.uk)|77.72.1.21|:443... connected.
HTTP request sent, awaiting response... 200 OK
Length: 23766751 (23M) [application/zip]
Saving to: ‘4k-exploit-files.zip’

4k-exploit-files.zi 100%[===================>]  22.67M  5.50MB/s    in 4.1s

2020-10-11 07:58:44 (5.50 MB/s) - ‘4k-exploit-files.zip’ saved [23766751/23766751]

[root@sysresccd ~/Desktop]# ls
4k-exploit-files.zip
Unzip the contents directly into the desktop:
[root@sysresccd ~/Desktop]# unzip 4k-exploit-files.zip
Archive:  4k-exploit-files.zip
  inflating: delete-amazon-launcher.txt
  inflating: disable-ota.txt
  inflating: exploit-commands.txt
 extracting: kamakiri-mantis-v1.2.zip
 extracting: Magisk-v20.4.zip
  inflating: NewSettingsRoot.apk
  inflating: root-4k.txt
[root@sysresccd ~/Desktop]# ls
4k-exploit-files.zip        exploit-commands.txt      NewSettingsRoot.apk
delete-amazon-launcher.txt  kamakiri-mantis-v1.2.zip  root-4k.txt
disable-ota.txt             Magisk-v20.4.zip
We need to download a second zip containing the bootloader scripts. The zip is available at https://flakie.co.uk/downloads/4k-extra-files.zip
[root@sysresccd ~/Desktop]# wget https://flakie.co.uk/downloads/4k-extra-files.zip
--2020-10-11 08:01:46--  https://flakie.co.uk/downloads/4k-extra-files.zip
Loaded CA certificate '/etc/ssl/certs/ca-certificates.crt'
Resolving flakie.co.uk (flakie.co.uk)... 77.72.1.21
Connecting to flakie.co.uk (flakie.co.uk)|77.72.1.21|:443... connected.
HTTP request sent, awaiting response... 200 OK
Length: 27522372 (26M) [application/zip]
Saving to: ‘4k-extra-files.zip’

4k-extra-files.zip  100%[===================>]  26.25M  6.47MB/s    in 4.6s

2020-10-11 08:01:51 (5.66 MB/s) - ‘4k-extra-files.zip’ saved [27522372/27522372]
Unzip the contents directly into the desktop:
[root@sysresccd ~/Desktop]# unzip 4k-extra-files.zip
Archive:  4k-extra-files.zip
  inflating: 4k-install-extra-files.txt
  inflating: File_Explorer_Plus-8.0.1.0_RU.apk
  inflating: LeanKeyKeyboardPro_v6.0.8_origin_r.apk
  inflating: YoWindow-v2.19.9.apk
[root@sysresccd ~/Desktop]# ls
4k-exploit-files.zip               kamakiri-mantis-v1.2.zip
4k-extra-files.zip                 LeanKeyKeyboardPro_v6.0.8_origin_r.apk
4k-install-extra-files.txt         Magisk-v20.4.zip
delete-amazon-launcher.txt         NewSettingsRoot.apk
disable-ota.txt                    root-4k.txt
exploit-commands.txt               YoWindow-v2.19.9.apk
File_Explorer_Plus-8.0.1.0_RU.apk
And then unzip kamakiri-mantis-v1.2.zip directly into the desktop too:
[root@sysresccd ~/Desktop]# unzip kamakiri-mantis-v1.2.zip
Archive:  kamakiri-mantis-v1.2.zip
   creating: kamakiri/
   creating: kamakiri/brom-payload/
   creating: kamakiri/brom-payload/stage2/
  inflating: kamakiri/brom-payload/stage2/stage2.bin
   creating: kamakiri/brom-payload/stage1/
  inflating: kamakiri/brom-payload/stage1/stage1.bin
   creating: kamakiri/bin/
  inflating: kamakiri/bin/tz.img
  inflating: kamakiri/bin/preloader.img
  inflating: kamakiri/bin/microloader.bin
  inflating: kamakiri/bin/lk.bin
  inflating: kamakiri/bin/twrp.img
   creating: kamakiri/lk-payload/
   creating: kamakiri/lk-payload/build/
  inflating: kamakiri/lk-payload/build/payload.bin
 extracting: kamakiri/bootrom-step.sh
   creating: kamakiri/modules/
  inflating: kamakiri/modules/logger.py
  inflating: kamakiri/modules/load_payload.py
  inflating: kamakiri/modules/functions.py
  inflating: kamakiri/modules/common.py
  inflating: kamakiri/modules/main.py
  inflating: kamakiri/fastboot-step.sh
   creating: META-INF/
   creating: META-INF/com/
   creating: META-INF/com/google/
   creating: META-INF/com/google/android/
  inflating: META-INF/com/google/android/update-binary
 extracting: META-INF/com/google/android/updater-script
[root@sysresccd ~/Desktop]# ls
4k-exploit-files.zip               kamakiri-mantis-v1.2.zip
4k-extra-files.zip                 LeanKeyKeyboardPro_v6.0.8_origin_r.apk
4k-install-extra-files.txt         Magisk-v20.4.zip
delete-amazon-launcher.txt         META-INF
disable-ota.txt                    NewSettingsRoot.apk
exploit-commands.txt               root-4k.txt
File_Explorer_Plus-8.0.1.0_RU.apk  YoWindow-v2.19.9.apk
kamakiri
We need to go into the kamakiri directory:
[root@sysresccd ~/Desktop]# cd kamakiri
[root@sysresccd ~/Desktop]# ls kamakiri
bin  bootrom-step.sh  brom-payload  fastboot-step.sh  lk-payload  modules
Execute the bootrom-step.sh script to initiate the bootloader unlocking scripts:
[root@sysresccd ~/Desktop/kamakiri]# ./bootrom-step.sh
[2020-10-11 08:02:32.432085] Waiting for bootrom
Now connect the Fire TV Stick USB to the computer running FireOS. Leave the HDMI end of the Fire TV Stick unconnected for now. The rooting script should detect the bootrom if the short is set up correctly.
If the short was not properly set then you’ll see an error message like this:
[2020-10-11 08:11:52.412845] Found port = /dev/ttyACM0
[2020-10-11 08:11:52.452394] Handshake
[2020-10-11 08:11:52.473815] Disable watchdog
Traceback (most recent call last):
  File "main.py", line 119, in <module>
    main(dev)
  File "main.py", line 24, in main
    load_payload(dev)
  File "/root/Desktop/kamakiri/modules/load_payload.py", line 47, in load_payload
    dev.write32(0x10007000, 0x22000000)
  File "/root/Desktop/kamakiri/modules/common.py", line 147, in write32
    self.check(self.dev.read(2), b'\x00\x01') # arg check
  File "/root/Desktop/kamakiri/modules/common.py", line 84, in check
    raise RuntimeError("ERROR: Serial protocol mismatch, expected {} got {}".format(gold.hex(), test.hex()))
RuntimeError: ERROR: Serial protocol mismatch, expected 0001 got 0000
Cancel the script with ctrl-c and try again by unplugging the Fire TV Stick USB and making sure that the correct caps are connecting properly on the device to create the short.
Try again running the bootrom script and connecting the USB from the Fire TV Stick.
If the short is set correctly then you’ll see a message saying that it’s been attached correctly. Remove the short carefully and press enter to continue:
[root@sysresccd ~/Desktop/kamakiri]# ./bootrom-step.sh
[2020-10-11 08:37:52.615981] Waiting for bootrom
[2020-10-11 08:37:56.886375] Found port = /dev/ttyACM0
[2020-10-11 08:37:56.886819] Handshake
[2020-10-11 08:37:56.887311] Disable watchdog

* * * If you have a short attached, remove it now * * *
* * * Press Enter to continue * * *
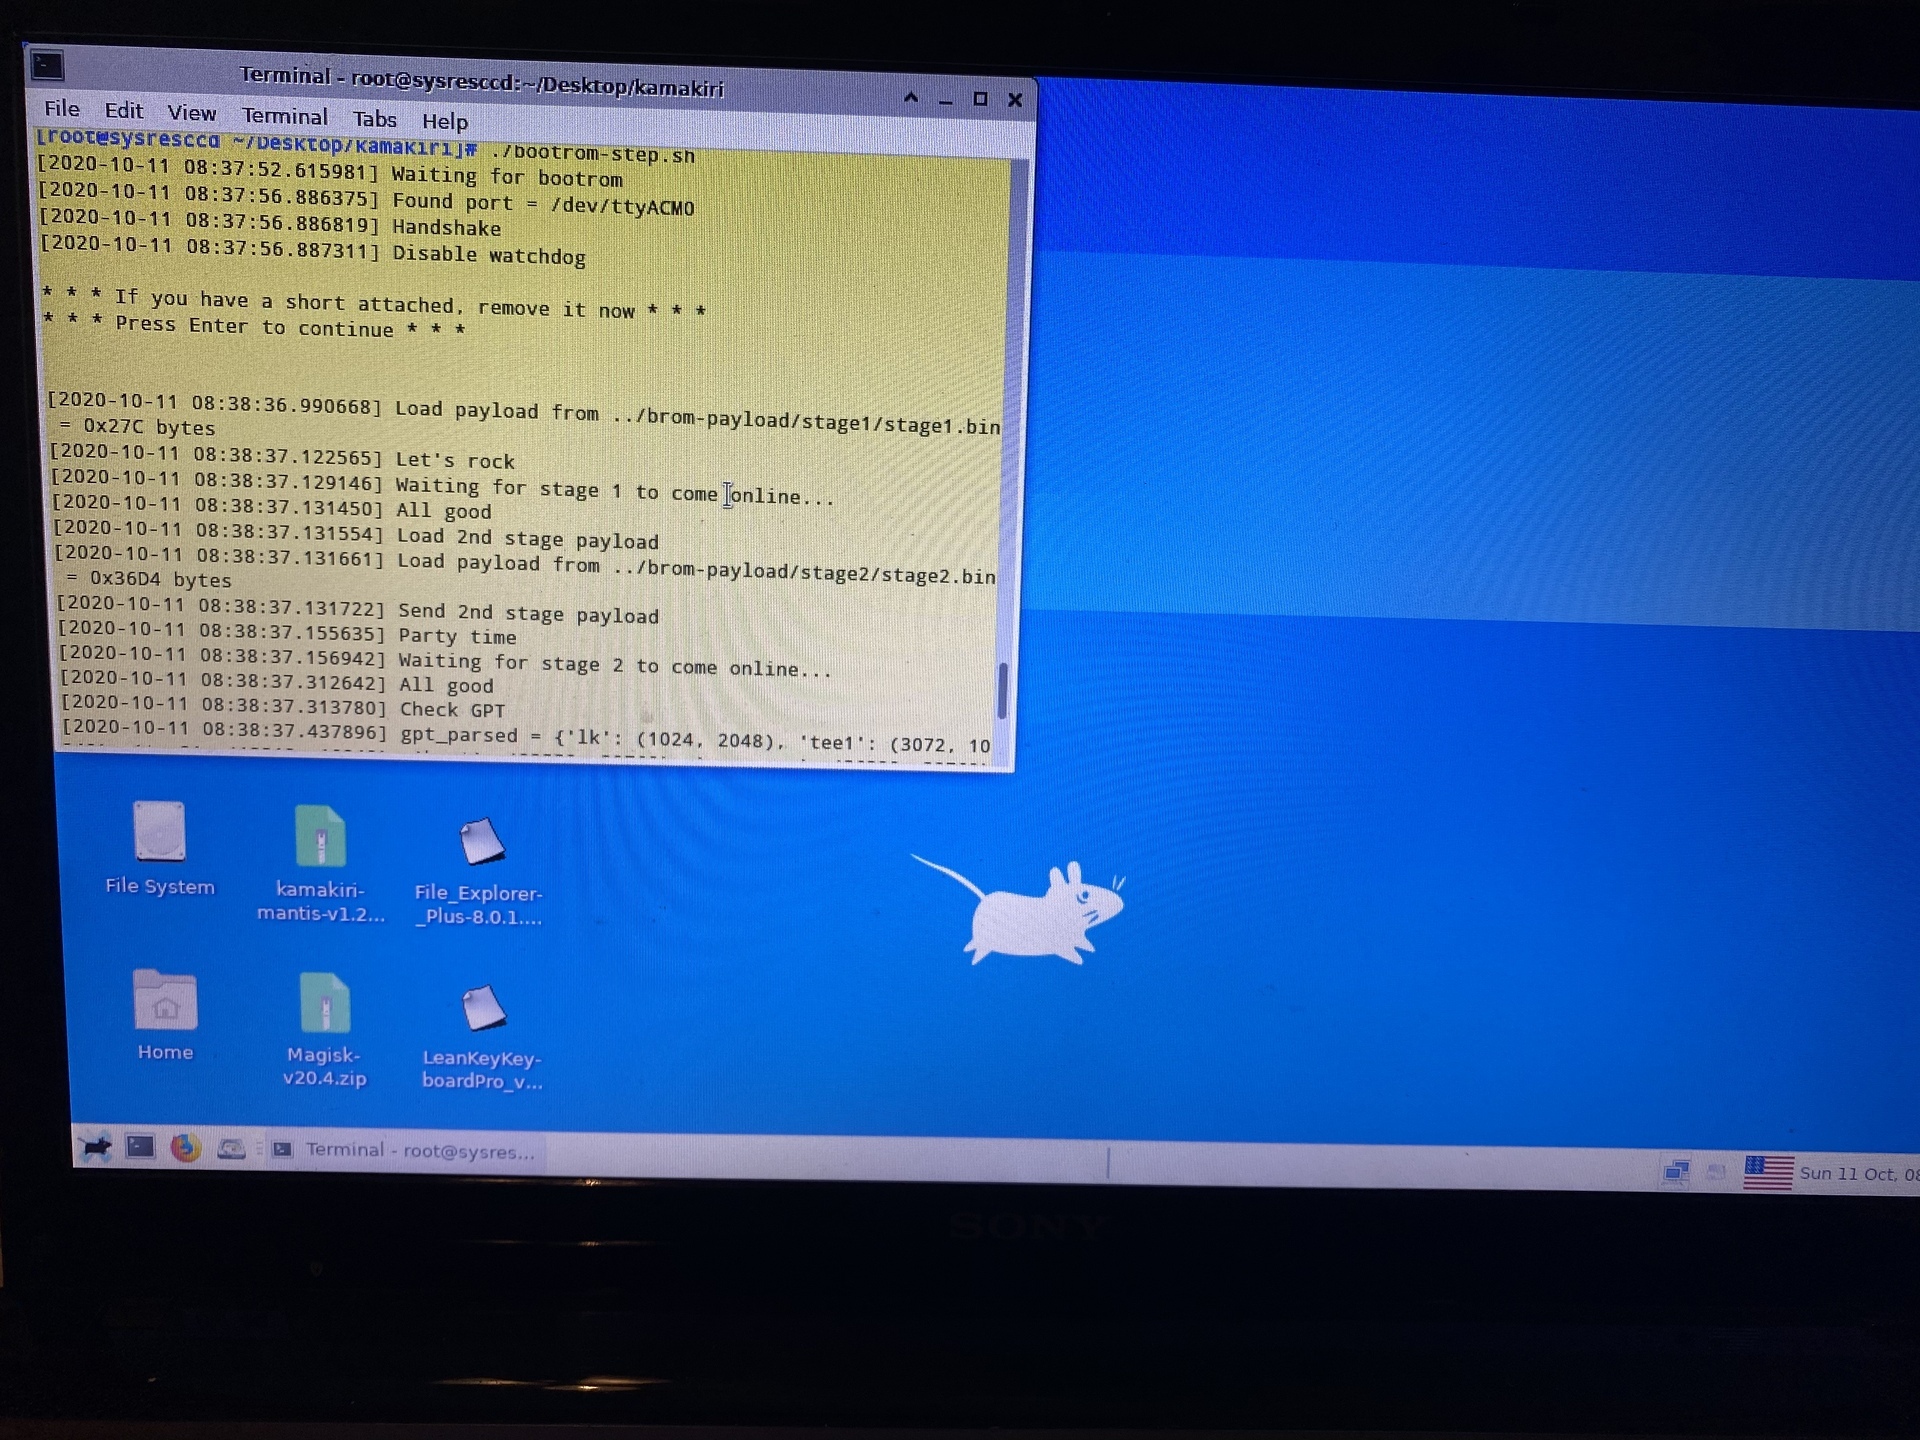
The rest of the bootrom logs will be as followed:
[2020-10-11 08:38:36.990668] Load payload from ../brom-payload/stage1/stage1.bin = 0x27C bytes
[2020-10-11 08:38:37.122565] Let's rock
[2020-10-11 08:38:37.129146] Waiting for stage 1 to come online...
[2020-10-11 08:38:37.131450] All good
[2020-10-11 08:38:37.131554] Load 2nd stage payload
[2020-10-11 08:38:37.131661] Load payload from ../brom-payload/stage2/stage2.bin = 0x36D4 bytes
[2020-10-11 08:38:37.131722] Send 2nd stage payload
[2020-10-11 08:38:37.155635] Party time
[2020-10-11 08:38:37.156942] Waiting for stage 2 to come online...
[2020-10-11 08:38:37.312642] All good
[2020-10-11 08:38:37.313780] Check GPT
[2020-10-11 08:38:37.437896] gpt_parsed = {'lk': (1024, 2048), 'tee1': (3072, 10240), 'tee2': (13312, 10240), 'boot': (23552, 32768), 'recovery': (56320, 32768), 'logo': (89088, 7168), 'kb': (96256, 2048), 'dkb': (98304, 2048), 'MISC': (100352, 2048), 'vendor': (102400, 307200), 'system': (409600, 2252800), 'cache': (2662400, 1048576), 'userdata': (3710976, 11562591), '': (0, 1)}
[2020-10-11 08:38:37.438143] Check boot0
[2020-10-11 08:38:37.477132] Check rpmb
[2020-10-11 08:38:37.682633] Clear preloader header
[4 / 4]
[2020-10-11 08:38:37.779397] Downgrade rpmb
[2020-10-11 08:38:37.781113] Recheck rpmb
[2020-10-11 08:38:38.663317] rpmb downgrade ok
[2020-10-11 08:38:38.663820] Flash tz
[7265 / 7265]
[2020-10-11 08:40:23.222117] Flash lk
[613 / 613]
[2020-10-11 08:40:32.074984] Flash lk-payload
[6 / 6]
[2020-10-11 08:40:32.201797] Inject microloader
[2 / 2]
[2 / 2]
[2020-10-11 08:40:32.375597] Force fastboot
[2020-10-11 08:40:32.470381] Flash preloader
[294 / 294]
[2020-10-11 08:40:41.757329] Reboot
At this stage the bootloader is ready to be flashed with the custom recovery image.
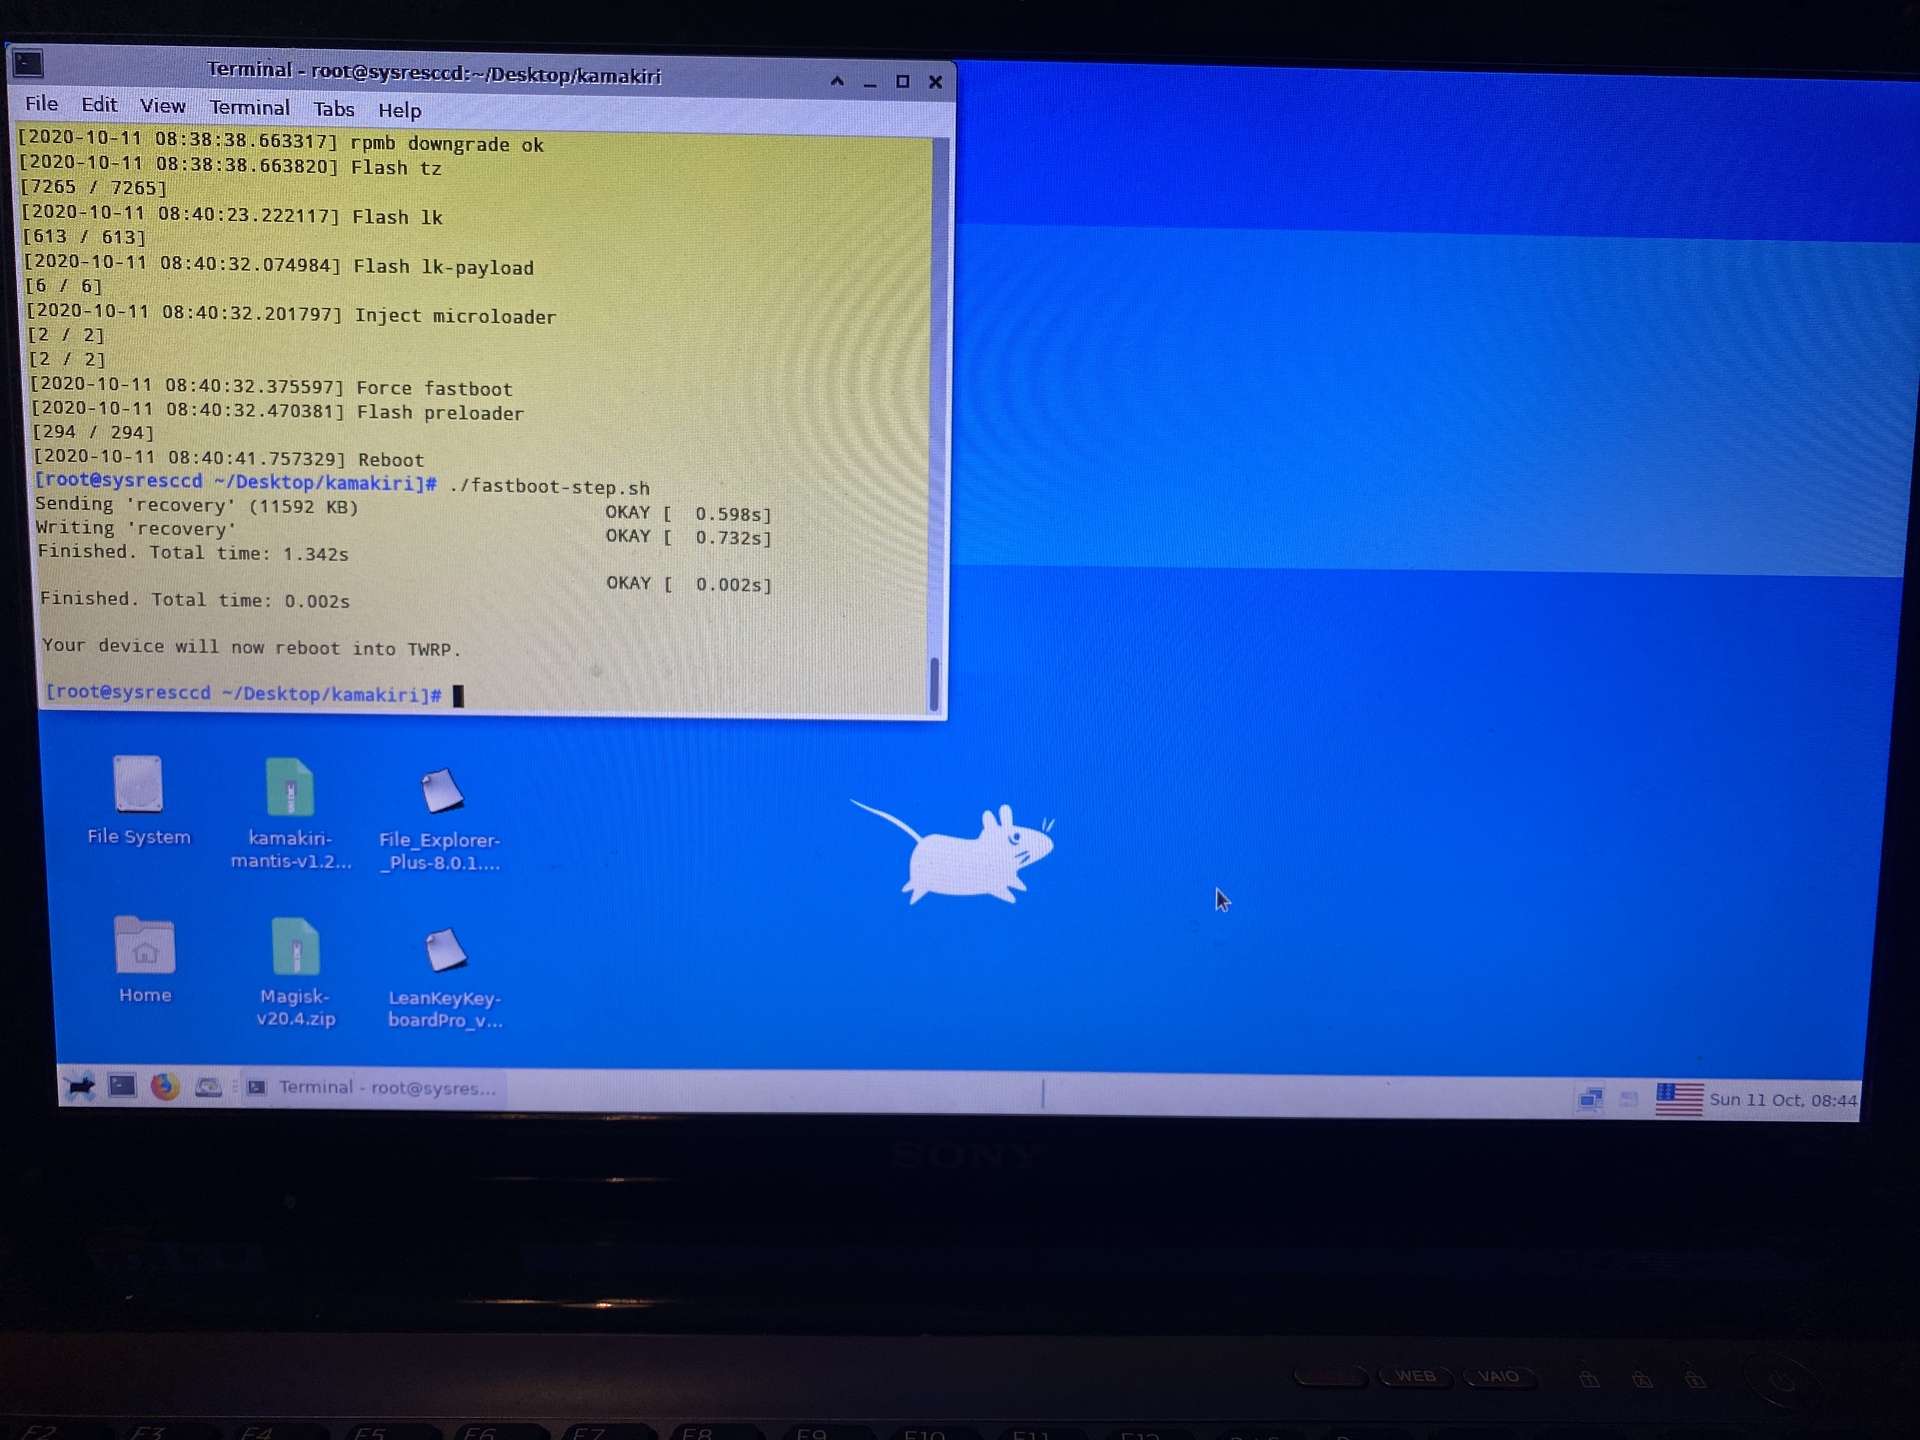
Run the fastboot-step.sh script to flash TWRP recovery:
[root@sysresccd ~/Desktop/kamakiri]# ./fastboot-step.sh
Sending 'recovery' (11592 KB)                      OKAY [  0.598s]
Writing 'recovery'                                 OKAY [  0.732s]
Finished. Total time: 1.342s
                                                   OKAY [  0.002s]
Finished. Total time: 0.002s

Your device will now reboot into TWRP.
[root@sysresccd ~/Desktop/kamakiri]# cd ..
Rooting with Magisk
Now that the bootloader is unlocked we can root it with Magisk. Reboot the device into TWRP recovery:
[root@sysresccd ~/Desktop]# adb reboot recovery
* daemon not running; starting now at tcp:5037
* daemon started successfully
Copy the Magisk zip file to the /sdcard location on the Fire TV Stick:
[root@sysresccd ~/Desktop]# adb push Magisk-v20.4.zip /sdcard/
Magisk-v20.4.zip: 1 file pushed. 14.4 MB/s (5942417 bytes in 0.393s)
Open up the adb shell:
[root@sysresccd ~/Desktop]# adb shell
Install Magisk through TWRP:
~ # twrp install /sdcard/Magisk-v20.4.zip
Installing zip file '/sdcard/Magisk-v20.4.zip'
Checking for Digest file...
[amonet] Load microloader from recovery...
[amonet] Remove boot patch...
[amonet] OK
***********************
 Magisk 20.4 Installer
***********************
- Mounting /system
- Mounting /vendor
- Target image: /dev/block/mmcblk0p4
- Device platform: arm
- Constructing environment
- Unpacking boot image
- Checking ramdisk status
- Stock boot image detected
- Patching ramdisk
- Repacking boot image
- Flashing new boot image
- Unmounting partitions
- Done
[amonet] Install boot patch...
[amonet] OK
[amonet] Install recovery patch...
[amonet] ALREADY_INSTALLED
Done processing script file
Wipe cache and dalvik cache:
~ # twrp wipe cache
Formatting Cache using mke2fs...
Done.
Done processing script file

~ # twrp wipe dalvik
Wiping Cache & Dalvik...
Cleaned: /data/dalvik-cache...
-- Dalvik Cache Directories Wipe Complete!
Done processing script file

~ # exit
Now we want to plug in the HDMI cable into the TV while still keeping the USB cable plugged into the computer.
Run adb devices and it should print the device ID followed by the word “device”. If the HDMI cable is not properly connect then it would say “unauthorized” instead.
[root@sysresccd ~/Desktop]# adb devices
List of devices attached
G070VM1594730MSE	device
Go into the adb shell and run su. You’ll have 10 seconds to press GRANT on the TV to grant superuser access forever.
[root@sysresccd ~/Desktop]# adb shell
mantis:/ $ su
Our Fire TV Stick is now rooted!
Disable OTA updates
It’s important to disable OTA (over-the-air) updates from Amazon so they can’t update and override our custom firmware. Disabling OTA updates will still allow individual applications to update as usual.
Use the package manager pm command in the adb shell to disable the following packages:
com.amazon.tv.forcedotaupdater.v2com.amazon.device.software.otacom.amazon.device.software.ota.override
[root@sysresccd ~/Desktop]# adb shell
mantis:/ $ pm disable com.amazon.tv.forcedotaupdater.v2
mantis:/ $ pm disable com.amazon.device.software.ota
mantis:/ $ pm disable com.amazon.device.software.ota.override
Disabling these packages is not permanent and we can reverse this action at any point in the future.
Connect Fire TV Stick to TV
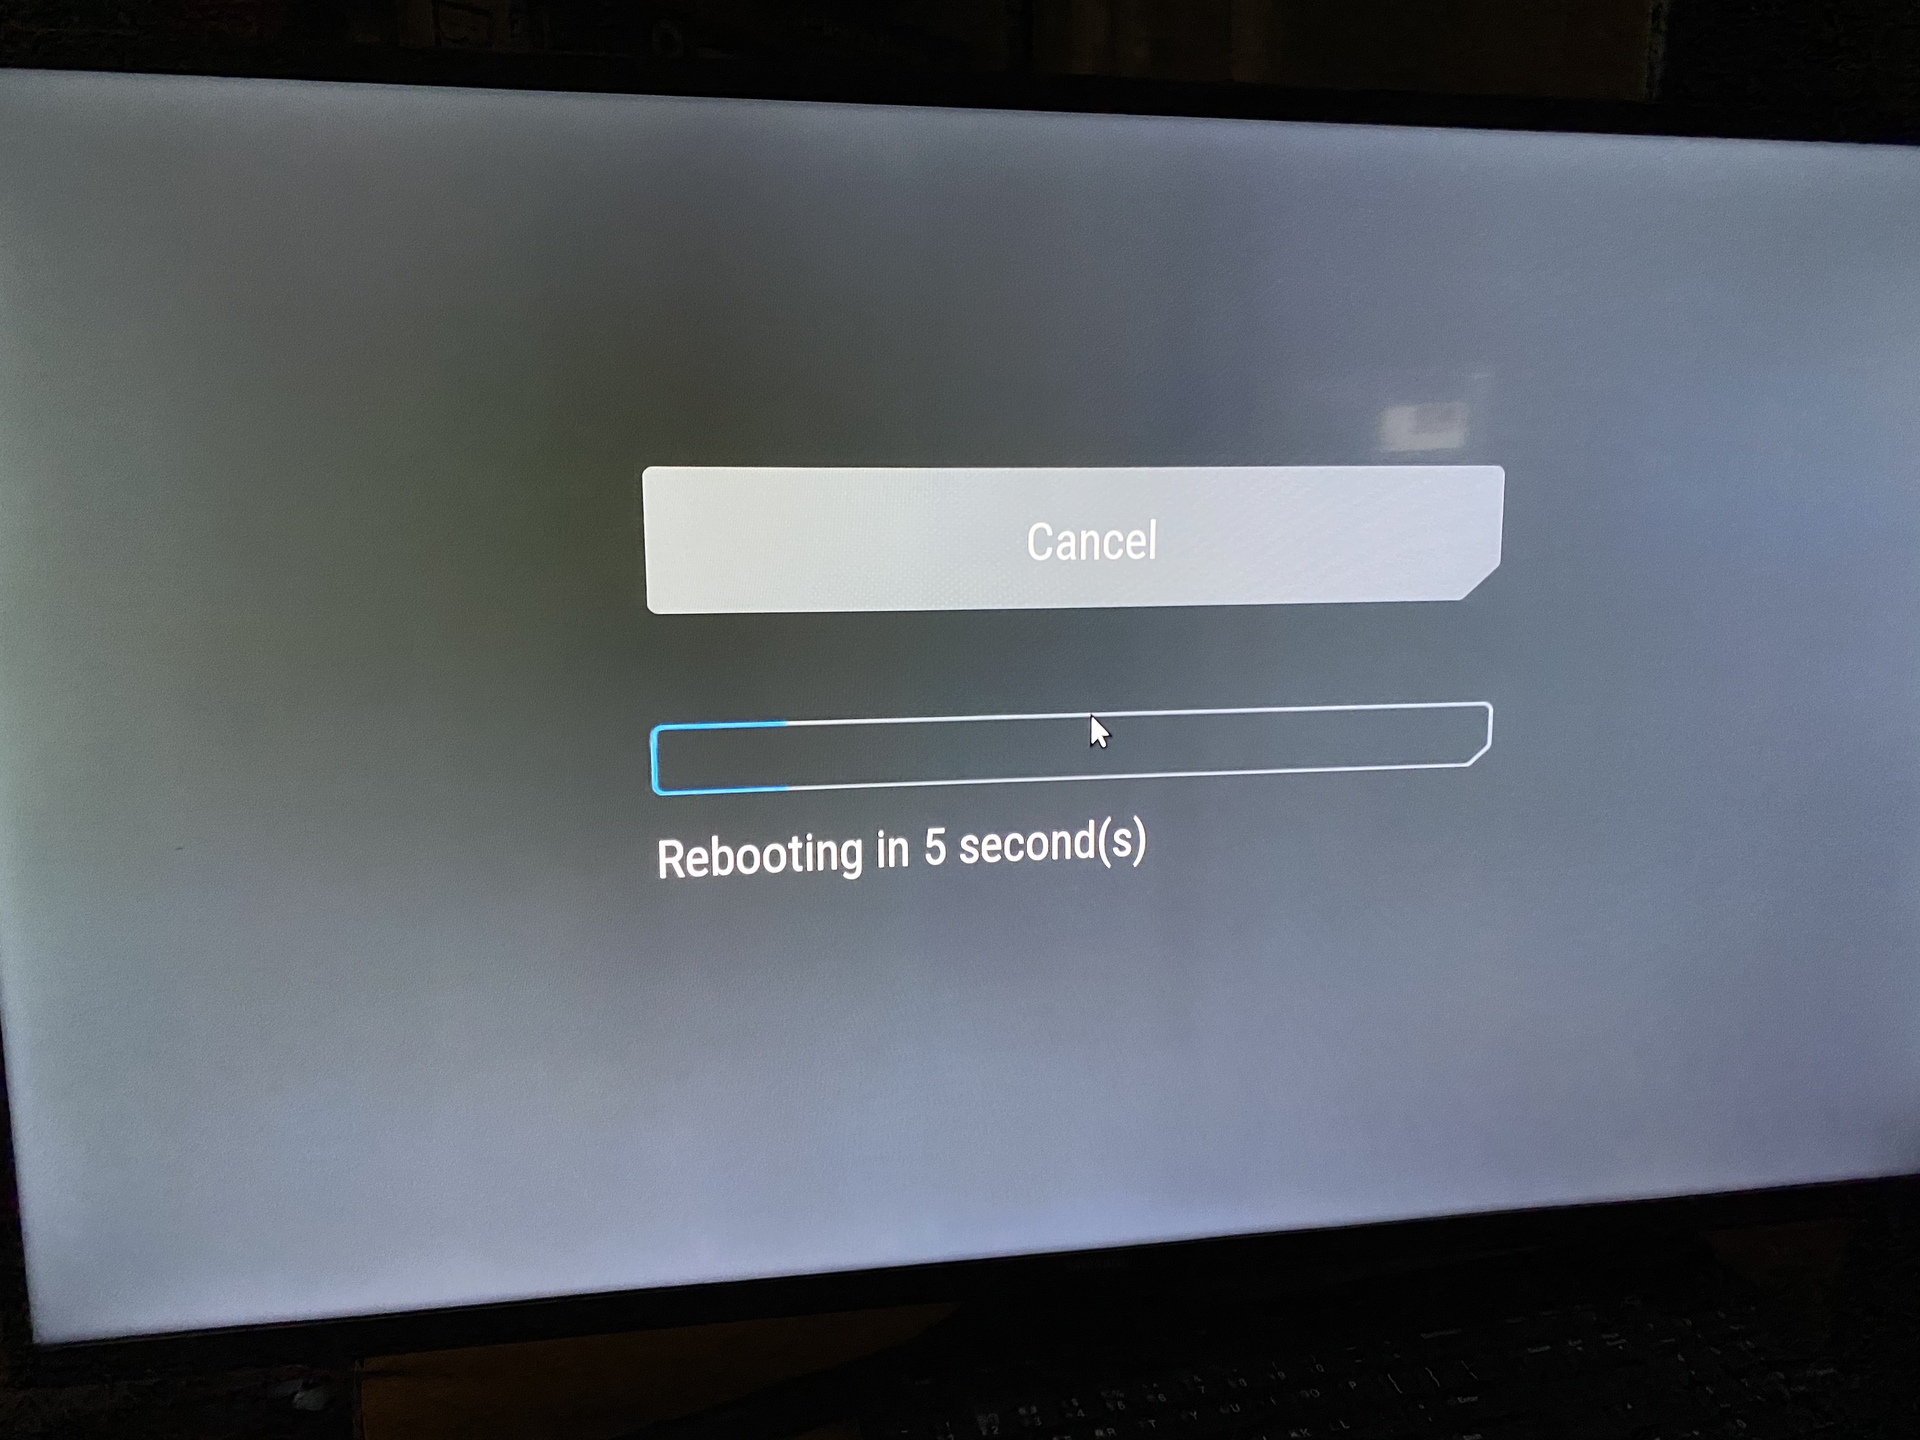
At this point you may unplug the Fire TV Stick from the computer and plug it into the wall outlet as you normally do. The HDMI cable can be plugged in to the TV. You’ll notice the TWRP screen when it’s booting up. You can press the cancel button to stop the normal boot proces and go into TWRP recovery instead.
We won’t be going into how to use TWRP in this post so just continue booting as normal by not doing any action during boot.
It’d be good to put back the case on the Fire TV Stick at this step since we no longer need access to the bootloader.
Install Termux
The following sections are completely optional and you may follow them if you want to install Arch Linux through the Termux.
Termux is a terminal emulator and linux environment for Android. Rooting the device is not required to use Termux or installing Arch Linux but using Linux on a rooted device allows you to install additional packages that require root access such as network scanners and linux containers.
Termux isn’t available in the Fire TV app store so we need to download the apk file indirectly. An easy way to install Termux is through F-Droid, a repository for free and open-source software for Android.
- Install the Downloader app from the Fire TV app store, which can be found by searching “downloader” in the search menu.
- Open the Downloader application and type in the following URL to download F-Droid:
https://f-droid.org/F-Droid.apk
- Click Install on the prompt and wait for it to install.
- Open F-Droid after installation and wait for updates to install.
- Search for “termux” in the search page.
- Install and open Termux.
Install Arch Linux
After opening Termux, install git which we’ll need for downloading packages:
$ pkg install git
Clone the repository https://github.com/SDRausty/termux-archlinux which is a collection of scripts to setup Arch linux in the Termux environment.
$ git clone https://github.com/SDRausty/termux-archlinux
Go into the repository and run the setupTermuxArch bash script:
$ cd termux-archlinux
$ ./setupTermuxArch
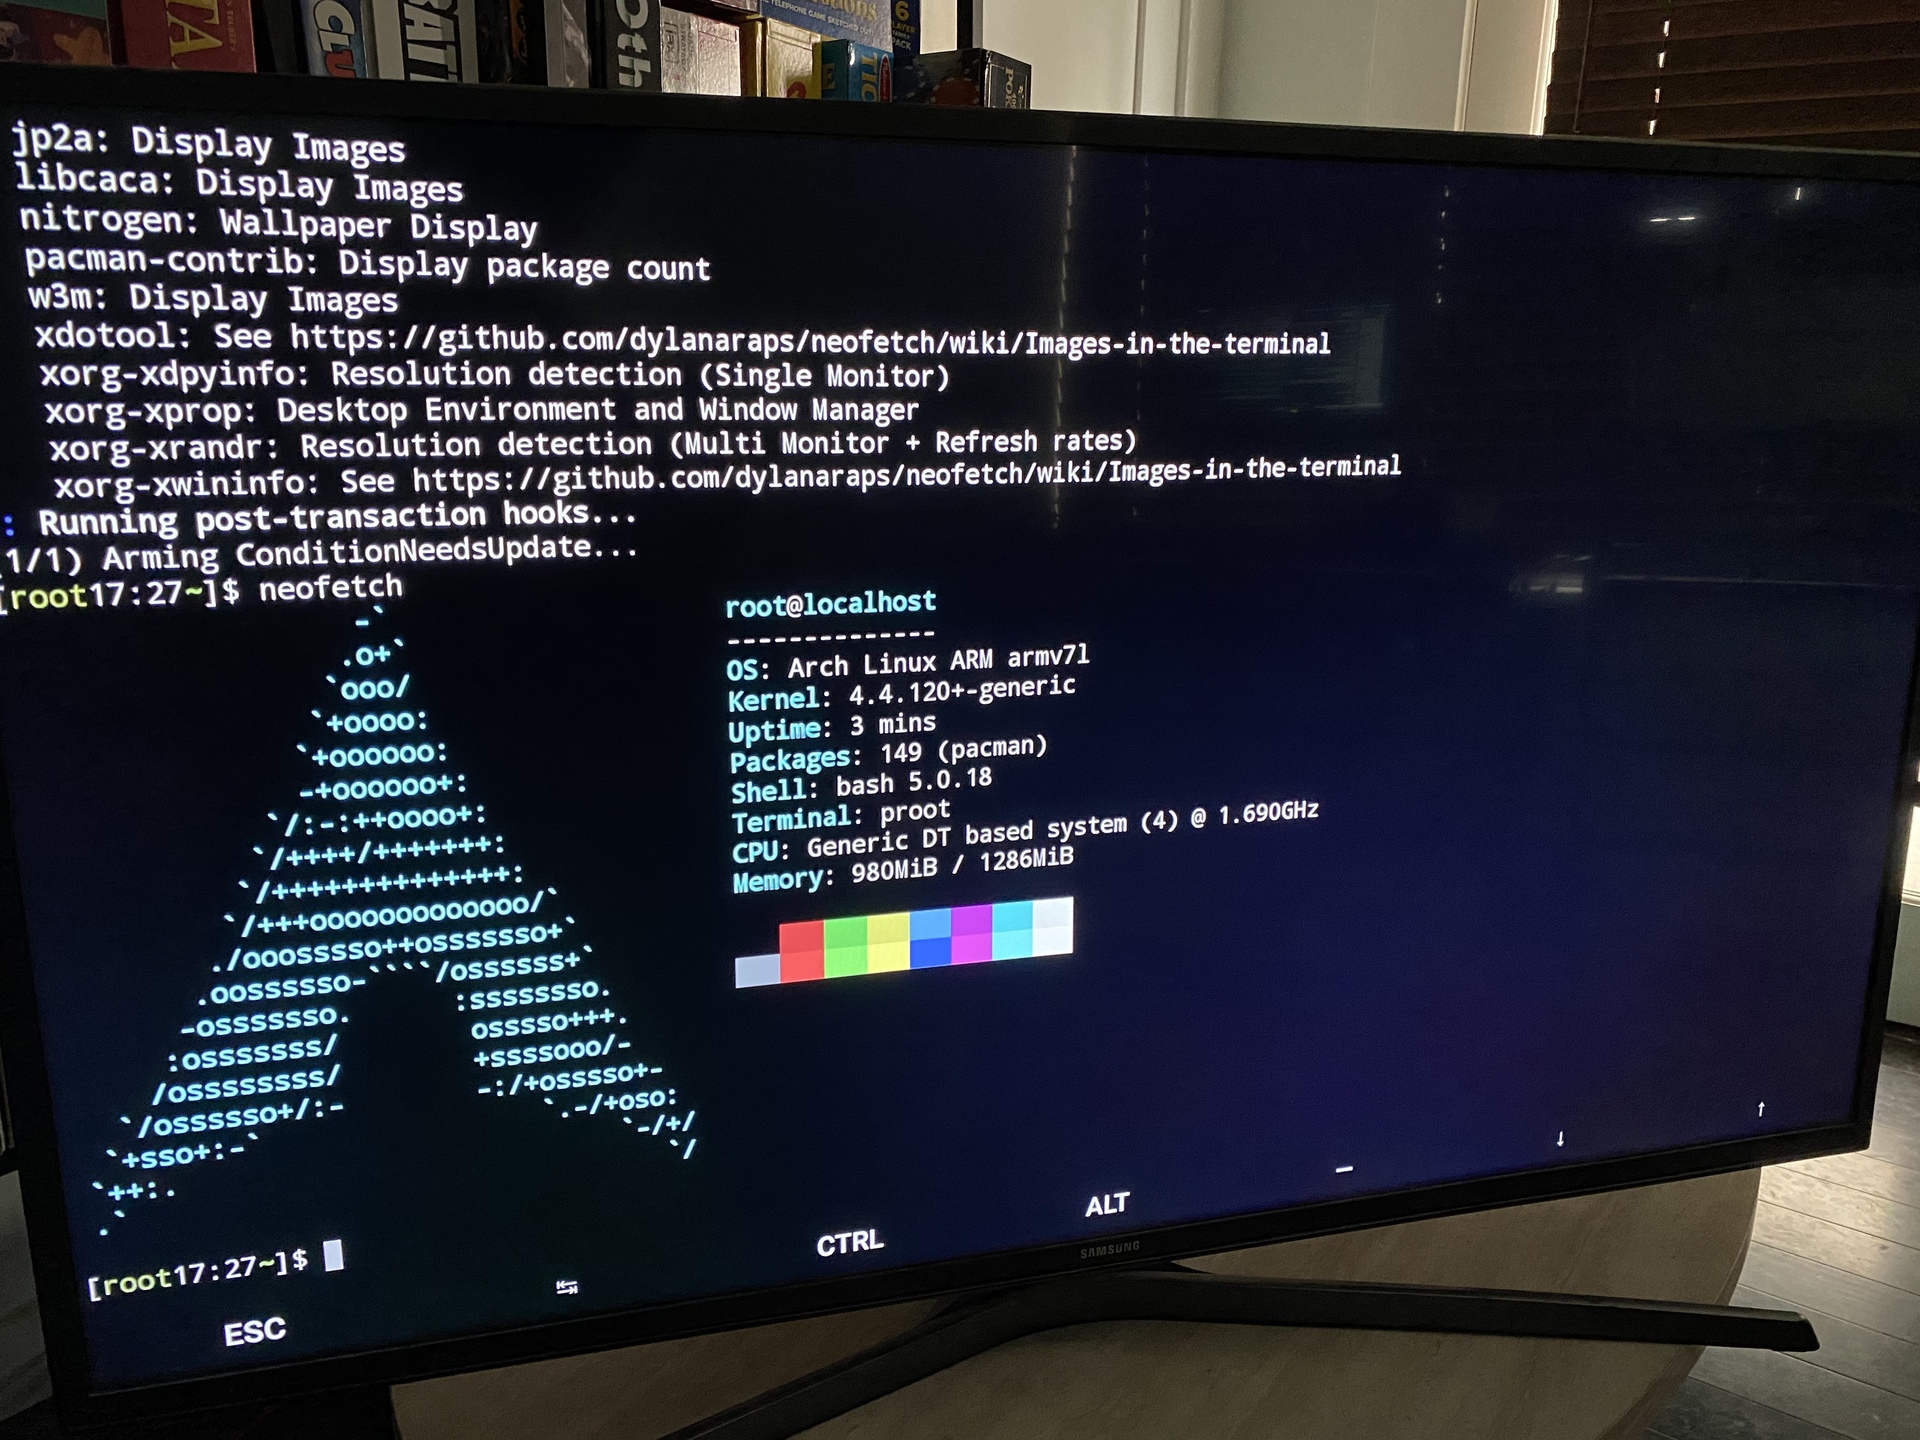
After a few minutes and if everything goes right you’ll have Arch installed. Run the startarch command to chroot into the arch directory.
$ startarch
[root17:26~]$
You can install packages with pacman as you normally would in Arch:
$ pacman -S neofetch
Expand Fire TV Stick storage
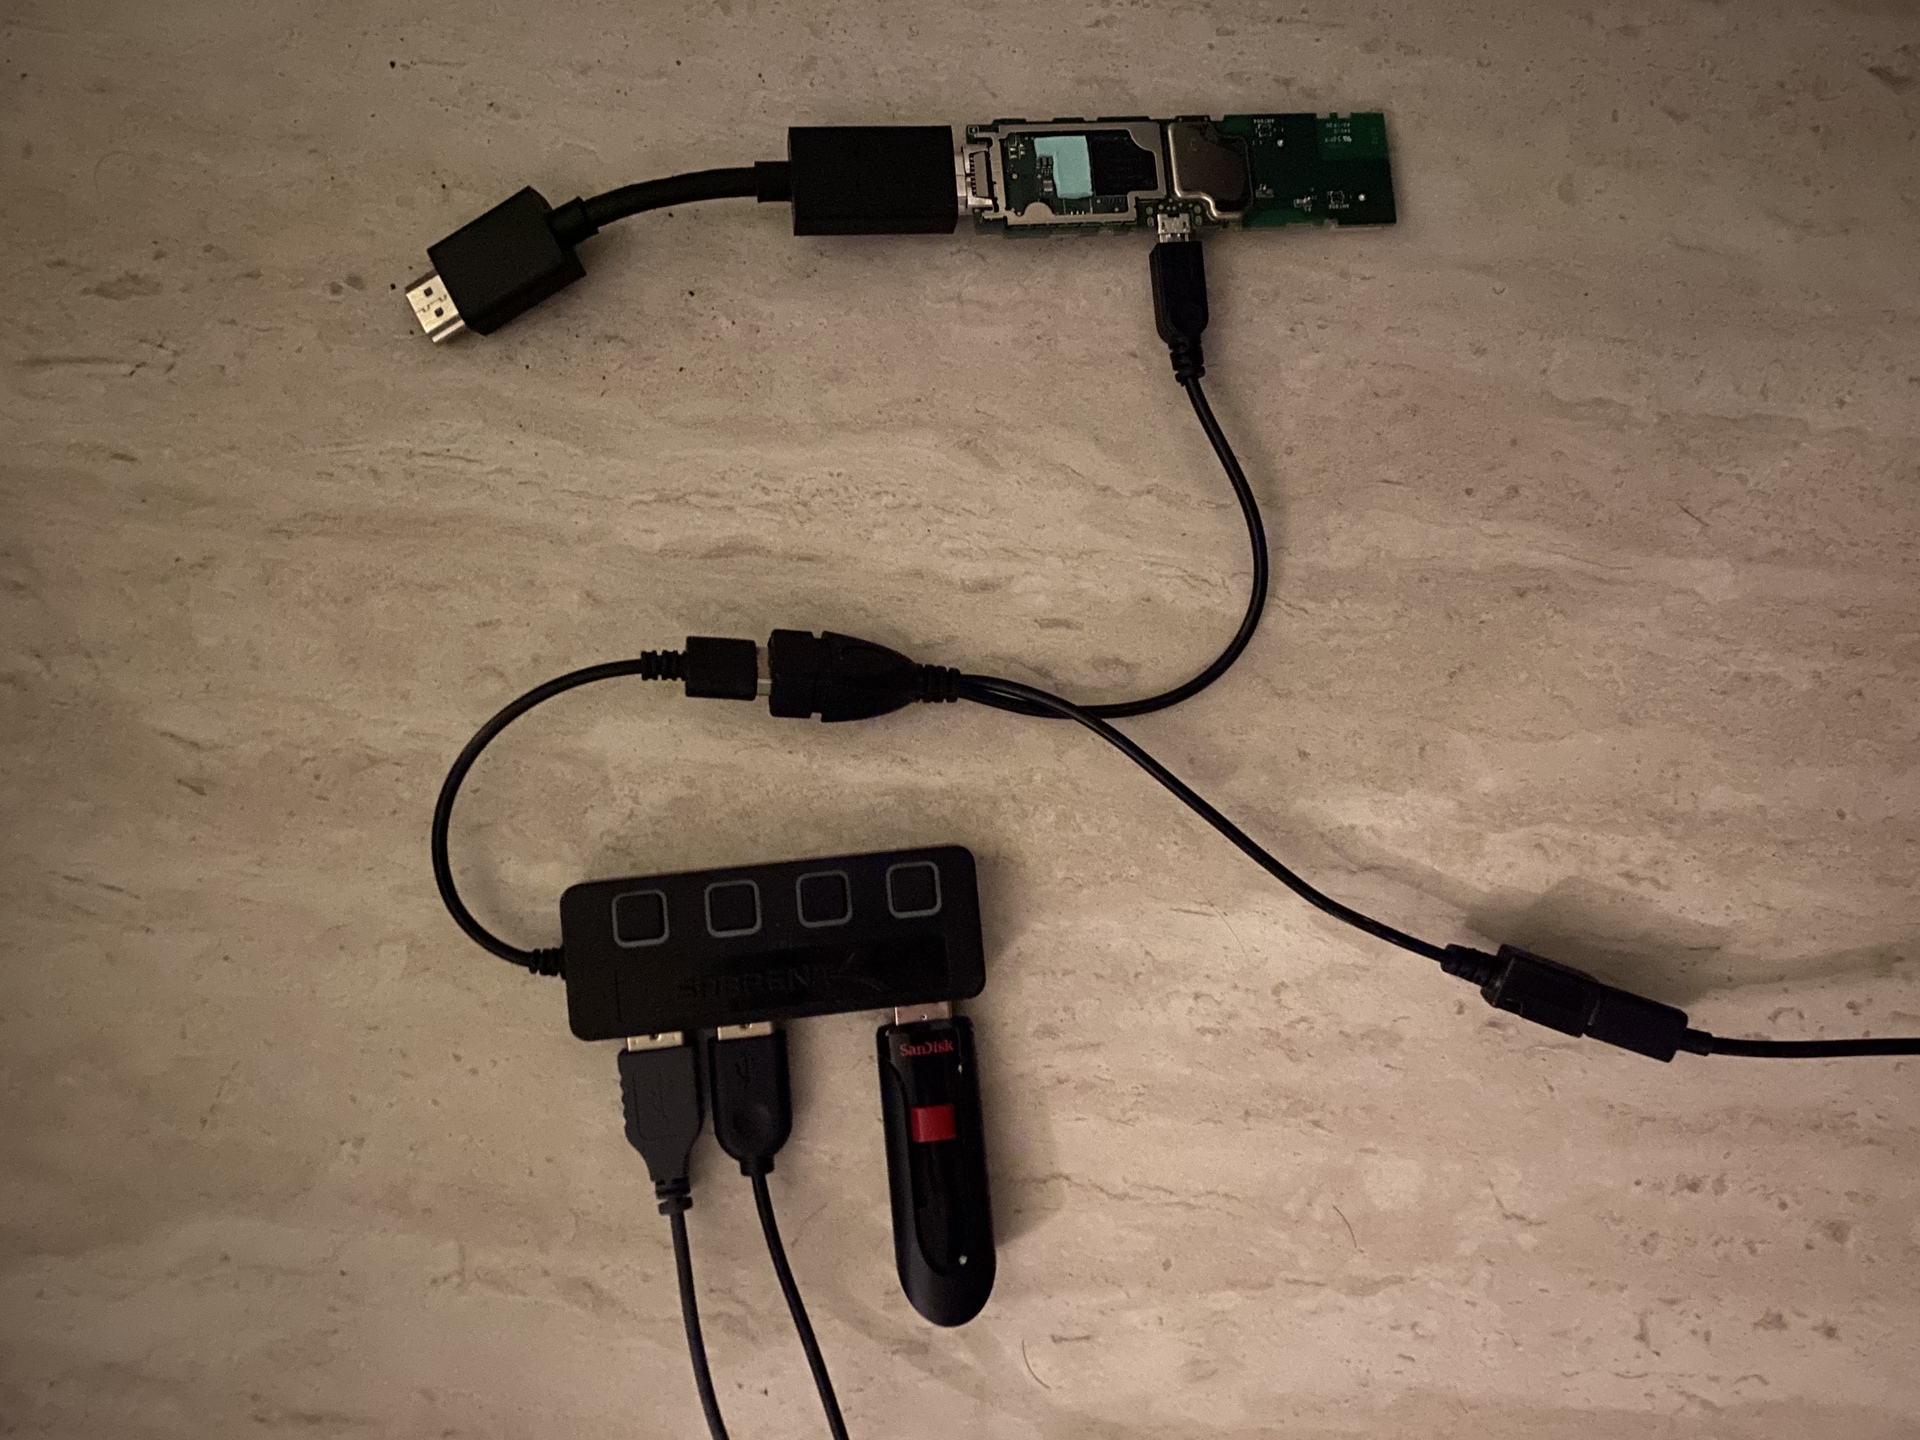
To hook up an external drive such as a USB stick to be used as external storage we’ll need an OTG cable (like this one). The OTG cable will allow our Fire TV Stick to interface with an external USB device.
Here I have a SanDisk USB drive connected to it.

You may also connect a USB hub to connect more USB devices. Here I have a wired mouse and keyboard connected alongside the USB drive for storage. Chaining multiple OTP cables won’t work.
After plugging in the USB drive that you want to use for external storage, we need to format the drive to make it usable for the Fire TV Stick.
Download Remote ADB Shell for the Fire TV Stick or connect to it remotely. You can download the APK through the Downloader app.
With adb shell open, use the sm command to partition the drive and define how much storage should be allocated for applications.
First list the USB drives and their IDs:
mantis:/ $ sm list-disks
disk:8,0
To allocate the entire drive to be used as application storage then use the private keyword when partitioning:
mantis:/ $ sm partition disk:8,0 private
You can use mixed to allocate a portion only. Here we only allocate 50% to be used for private storage:
mantis:/ $ sm partition disk:8,0 mixed 50
For example, if you choose 75, then 25% is allocated to private storage.
Now list the mounted USB drives under /mnt/expand/:
mantis:/ $ mount | grep expand
/dev/block/dm-2 on /mnt/expand/becae80cd-fd2c-45bd-9200-8585e9a500c2 type ext4
(rw,dirsync,seclabel,nosuid,nodeev,noatime,block_validity,delalloc,barrier,user_xattr)
If you should see something like the above if everything went correctly.
Now that our drive is usable to the Fire TV stick, we can go back into Termux and run the termux-setup-storage command to mount the drive and other useful directories in the home folder:
$ termux-setup-storage
$ ls
arch storage
$ ls storage
dcim downloads external-1 movies music pictures shared
$ ls -l storage
lrwxrwxrwx 1 u0_a192 u0_a192 24 Sep 12 18:01 dcim -> /storage/emulated/0/DCIM
lrwxrwxrwx 1 u0_a192 u0_a192 28 Sep 12 18:01 downloads -> /storage/emulated/0/Download
lrwxrwxrwx 1 u0_a192 u0_a192 48 Sep 12 18:01 external-1 -> /storage/68BA-19EC/Android/data/com.termux/files
lrwxrwxrwx 1 u0_a192 u0_a192 26 Sep 12 18:01 movies -> /storage/emulated/0/Movies
lrwxrwxrwx 1 u0_a192 u0_a192 25 Sep 12 18:01 music -> /storage/emulated/0/Music
lrwxrwxrwx 1 u0_a192 u0_a192 28 Sep 12 18:01 pictures -> /storage/emulated/0/Pictures
lrwxrwxrwx 1 u0_a192 u0_a192 19 Sep 12 18:01 shared -> /storage/emulated/0
The important thing here is that external-1 is our USB drive that we mounted and now use for storage.
To you’re running low on internal storage and want to move applications to the USB drive, then do the following:
Open up adb shell again. List the applications installed with the pm command and filter for the particular application you want to move.
mantis:/ $ pm list packages | grep netflix
package:com.netflix.ninja
Move the application with the move-package subcommand where the first argument is the full application name and the second argument is the UUID of the storage device (which we retrieved earlier with the mount command):
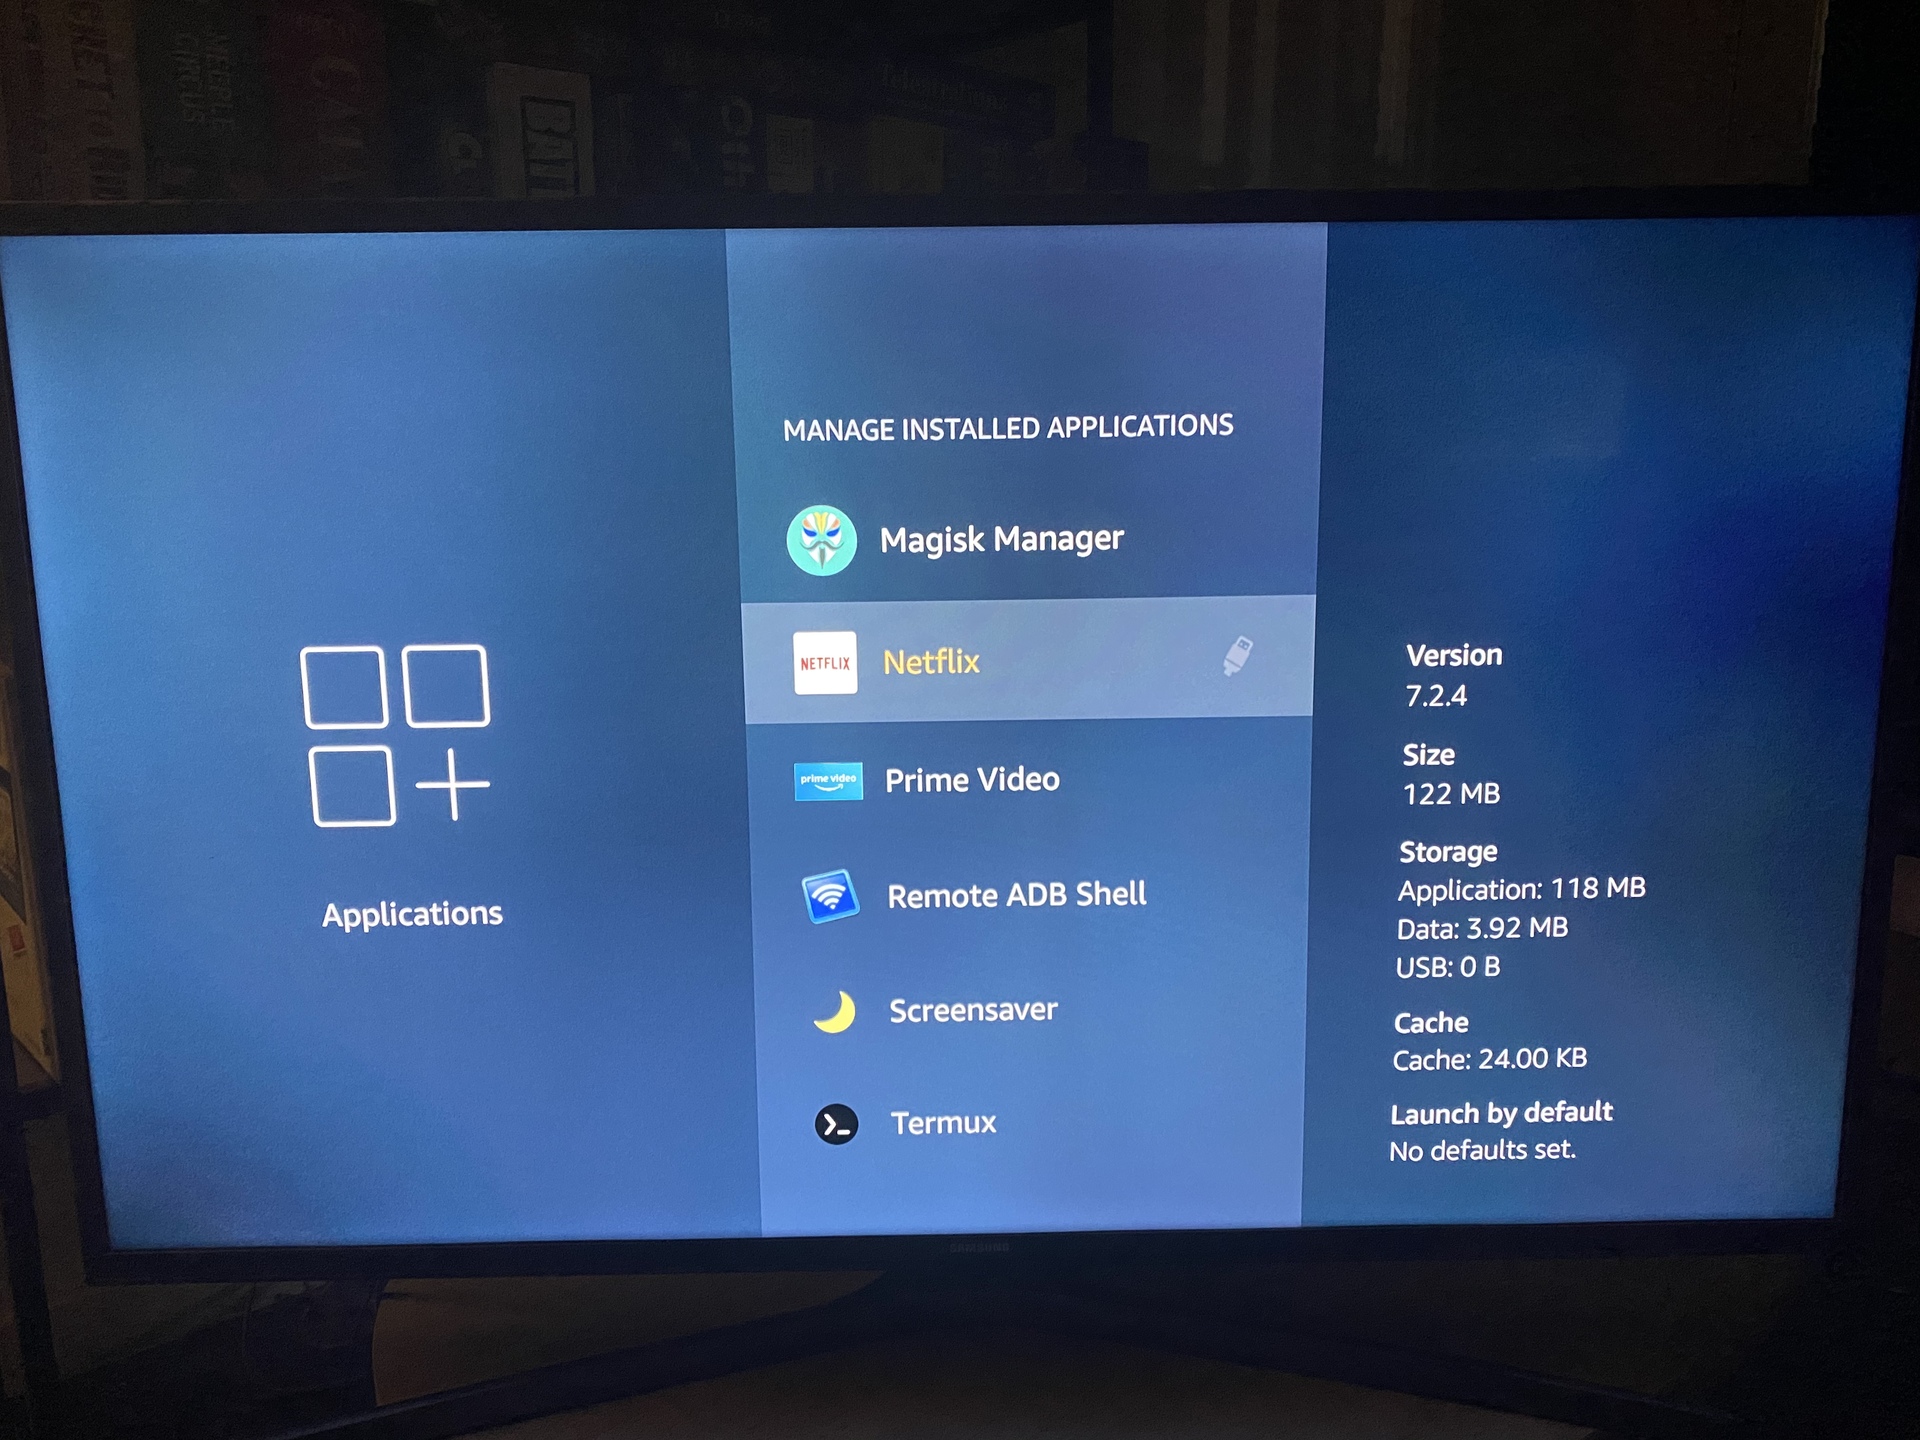
mantis:/ $ pm move-package com.netflix.ninja becae80cd-fd2c-45bd-9200-8585e9a500c2
Success
You should now see a USB icon next to the application name in Manage Installed Applications settings screen:
Notes
Here’s a list of things that I stumbled across and would be good to know:
- The directory hierarchy in Termux is not the same as a standard Linux. For example, in termux everything is under
/data/data/com.termux/filesand there is no/tmp. UsePRootto install a standard Linux distribution. - Termux could not be installed directly on the USB drive because Termux has a lot of package paths hardcoded that rely on the internal storage.
- You can’t execute scripts under the USB drive since it is mounted with the
noexecmount option. This option prevents execution of binaries in that mounted filesytem. - Sometimes git didn’t work when it was in a symlinked directory. See this issue thread.
Conclusion
We learned how to root a Fire TV Stick 4K. This post barely scratched the surface on all the possible things that can be done now on the rooted device. I recommend learning more and trying out all the new things you can do now!
Resources
I recommend checking out the following resources to fill in any gaps during this tutorial. These articles are what help me learn about rooting the Fire TV Stick 4K.
- UNLOCK|ROOT|TWRP|UNBRICK Fire TV Stick 4K (mantis)
- Unlocking the Bootloader and Installing TWRP
- Instructions: How to root the new Fire TV Stick 4k (German)
- Unlock and Root a Firestick 4K - Part 1 (Video)
- Unlock and Root a Firestick 4K - Part 2 (Video)
- Amazon Fire TV Stick 4K can now be bootloader unlocked
- FireTV Stick 4K Boot Loader Unlock (Korean)